1. Introduction
Welcome to the second part of the article about creating a simple 3D physics game using Castle Game Engine.
Castle Game Engine is a cross-platform (desktop, mobile, consoles) 3D and 2D game engine using modern Pascal. It’s free and open-source and works with both FPC and Delphi.
In the first part, we learned how to use the visual editor and we have designed a chessboard with chess pieces. Then we used physics to throw the chess piece, such that it collides and knocks down other chess pieces. Remember this is a bad way to play chess. But it’s really fun!
If you have missed the first part, you can still "jump in" at this point. Just download Castle Game Engine from https://castle-engine.io/ and either set up the chessboard and chess pieces yourself, or use our ready example project from https://github.com/castle-engine/bad-chess/ in the subdirectory project/version_1_designed_in_editor. This project version is a good starting point for this article part.
We encourage you to follow this article and perform all the steps yourself, to create a similar toy. If you ever get stuck, you can look at the finished project. It is available in the subdirectory project/version_2_with_code in the same repository, https://github.com/castle-engine/bad-chess/ . It’s the final project, with everything described in this article done and working.
And if you really just want to play the worst version of chess, right now, you can download the ready compiled game (for Linux or Windows) from https://castle-engine.itch.io/bad-chess . Enjoy!
2. Coding the game
The focus of this part is to learn how to use Pascal code to make things happen in your game.
The core of Castle Game Engine is just a set of Pascal units that can be compiled using FPC and Delphi. Thus the games we create are also just regular Pascal programs that happen to use a few Castle Game Engine units. This means that you can use the workflow you already know and like, with whatever Pascal text editor and compiler you prefer.
In particular we support Delphi, Lazarus, VS Code or any other custom editor (like Emacs). We have a dedicated documentation with some IDE-specific hints on https://castle-engine.io/manual_ide.php . Basically just open in Castle Game Engine editor the panel "Preferences → Code Editor", configure there which Pascal IDE you use, and everything should work out-of-the-box. If you double-click on a Pascal file from CGE editor, it will open in the text editor you configured.
Specifically for VS Code users, we feature a dedicated extension providing perfect Castle Game Engine integration with VS Code. It provides Pascal syntax highlighting, code completion and ability to compile, run or debug a Castle Game Engine project straight from VS Code. Head on to https://castle-engine.io/vscode for links and more documentation.
Note that, while the focus of this chapter is to write Pascal code, we do not stop using Castle Game Engine editor. There are a few things you can do in the editor to make the design "friendly" to the code manipulation and we will explore them in this article. So writing Pascal code, and editing the design visually, go hand-in-hand.
3. Exercises
3.1. Handle a key press to change position of an object
Let’s start simple. First goal: When user presses a key x, we want to move the black king chess piece a bit higher. It’s a simple test that we can:
-
React to user input (key press).
-
In response, do something interesting in 3D world (move a chess piece).
Most of the code you write in Castle Game Engine is placed in a unit associated with a view. We talked about what is a view in Castle Game Engine in the previous article part, the short recap is that you use views similar to how you use forms in a typical Delphi FMX / VCL or Lazarus LCL application: a view is a visual design (in data/gameviewmain.castle-user-interface) and associated code (in code/gameviewmain.pas).
So let’s open the file code/gameviewmain.pas in your favorite Pascal IDE. In the Castle Game Engine editor, you can just use the bottom "Files" panel. Enter the code subdirectory and double-click on the gameviewmain.pas file. Alternatively, you can just open your Pascal IDE and from it open the Pascal project. The basic project files (like my_project.dproj for Delphi or my_project.lpi for Lazarus) have been already generated for you.
Keep the Castle Game Engine visual editor open too, with our view design data/gameviewmain.castle-user-interface . We will occasionally adjust or consult our visual design, to make sure it is useful for our code logic.
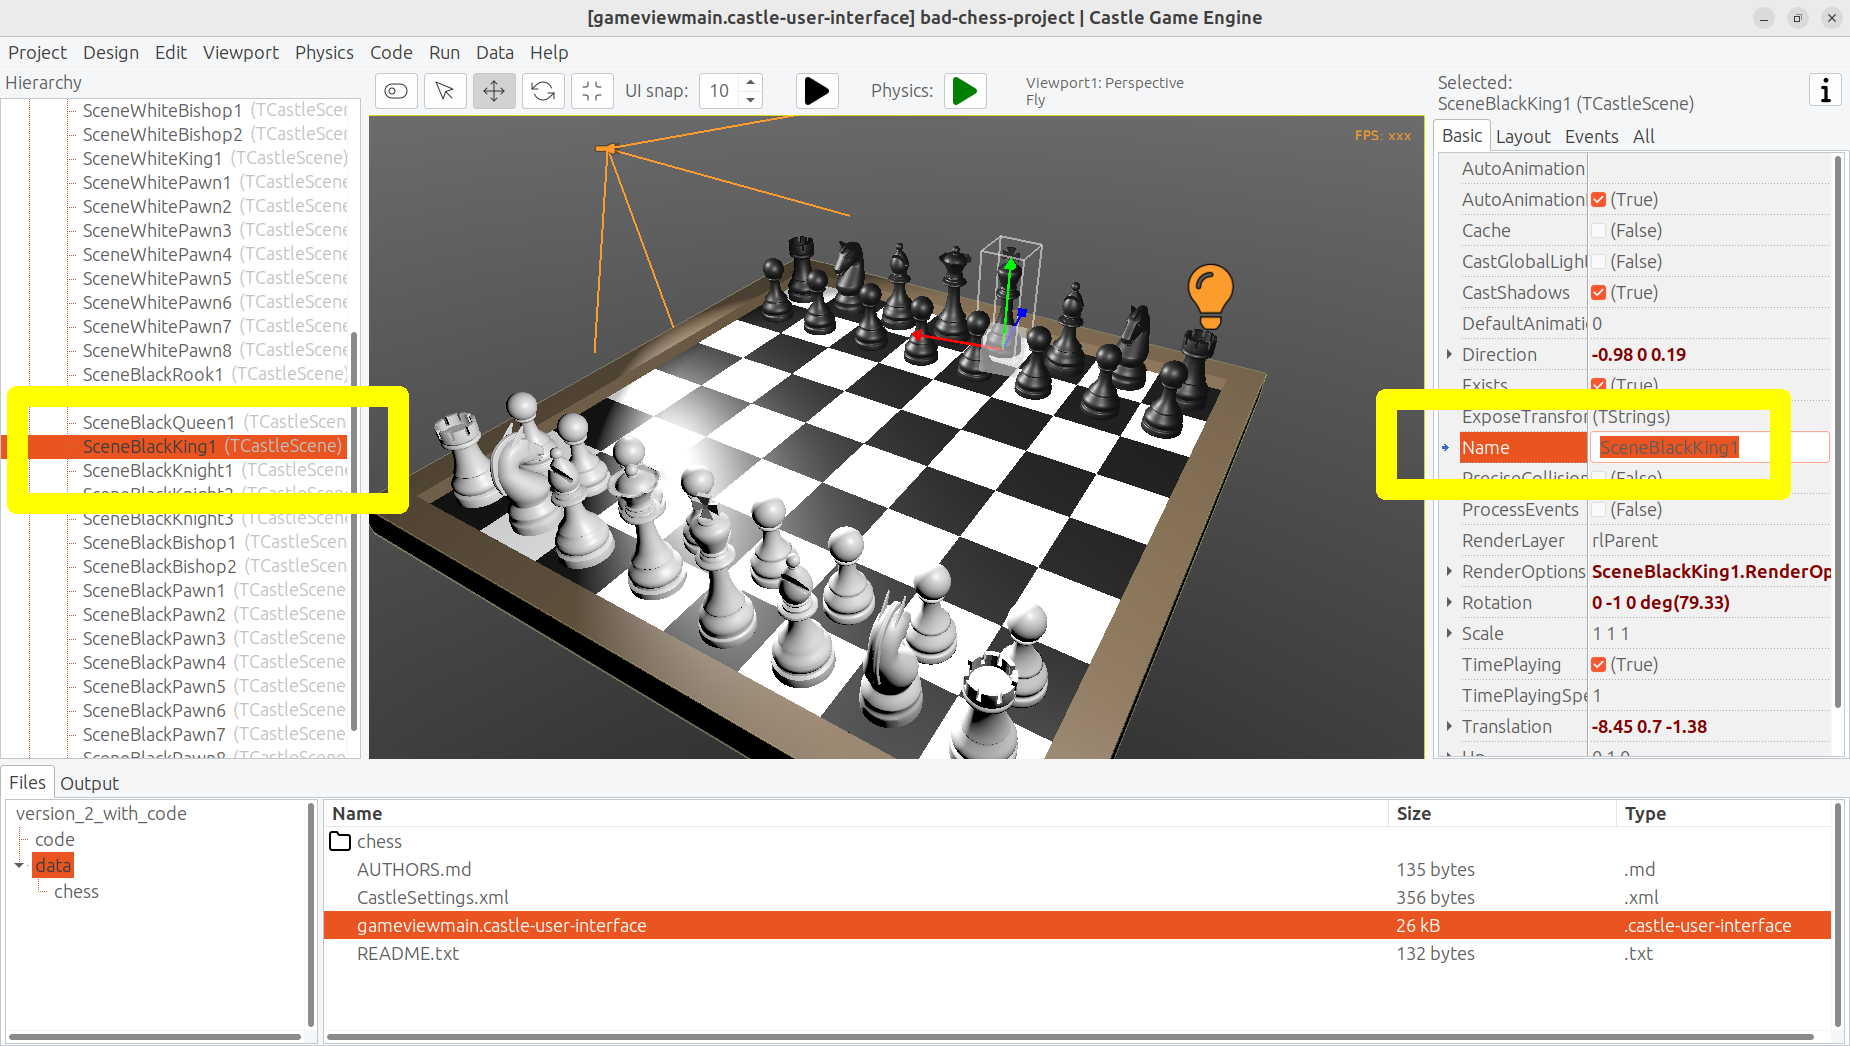
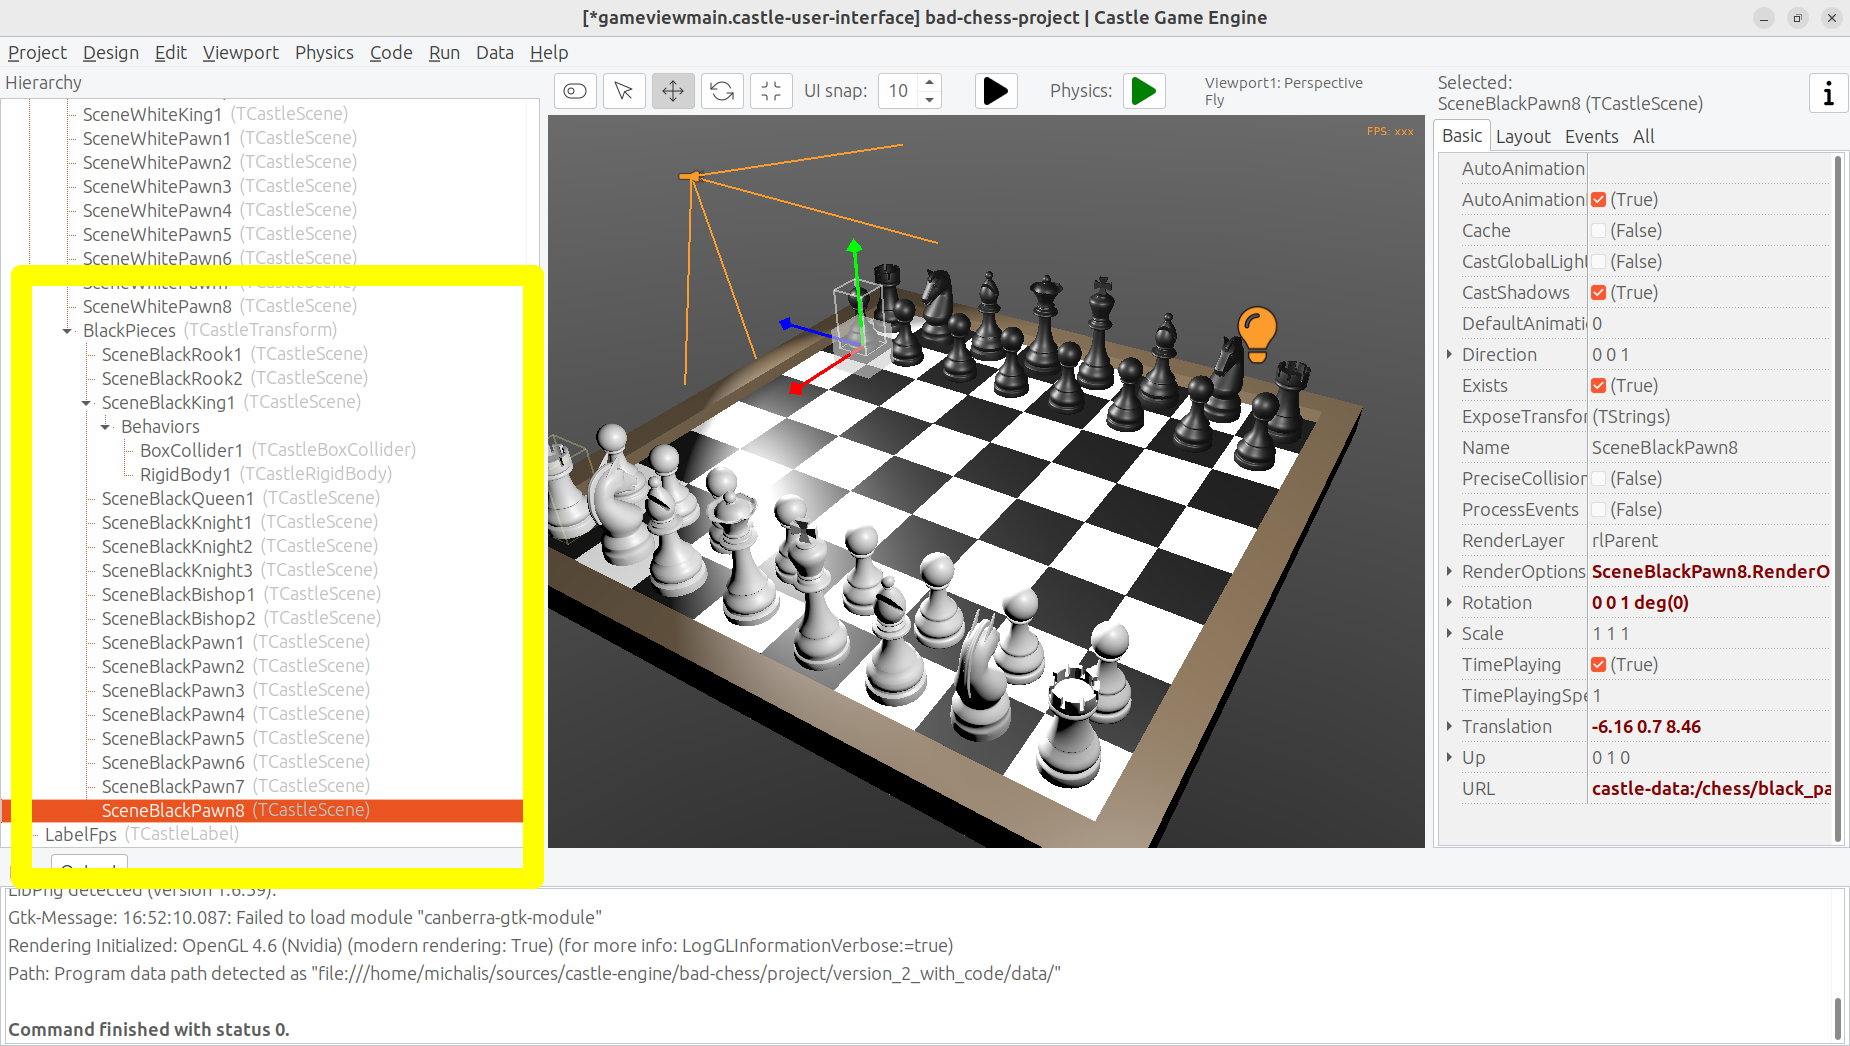
For start, we want to know the name of the component representing the black king. Just as you’ve seen when designing Lazarus and Delphi forms, every component has a name which corresponds to how this component can be accessed from code. You can edit the component name in Castle Game Engine by either editing the Name row in Object Inspector (on the right) or editing the name in the hierarchy (on the left). Simply click on the component name in hierarchy or press F2 to go into name editing. On the screenshot below, you can see that black king is named SceneBlackKing1. I can use Ctrl+C to copy this to the clipboard.
Note that, for this first code exercise, we assume that the chess piece (SceneBlackKing1) does not have any physics components. If you have added TCastleRigidBody or TCastleXxxCollider components as behaviors of SceneBlackKing1, please remove them for now. We will restore them in the next exercise.
Now we have to declare the variable with the exact same name in the view. It will be automatically initialized to point to the component when we start the view. Do this in the published section of the class TViewMain. This is how the end result should look like:
uses Classes,
  CastleVectors, CastleComponentSerialize,
  CastleUIControls, CastleControls, CastleKeysMouse, CastleScene;

type
  { Main view, where most of the application logic takes place. }
  TViewMain = class(TCastleView)
  published
    { Components designed using CGE editor.
      These fields will be automatically initialized at Start. }
    LabelFps: TCastleLabel;
    SceneBlackKing1: TCastleScene; //< new line
  public
  ...
Note: Right now, the Castle Game Engine editor doesn’t do this automatically for you. That is, we don’t automatically update your Pascal sources to declare all the components. We have a plan to do this soon. The user experience will have to be a bit different than on Delphi and Lazarus forms, because the game visual designs can easily have hundredths of components that are not supposed to be used from code, so synchronizing them all with Pascal code would create unnecessary noise in your Pascal unit. We will instead make a button to only expose a subset of designed components for code.
Once you have declared the published field, we can access the SceneBlackKing1 from code, getting and setting its properties, calling its methods anywhere we like. For this exercise, let’s modify the Translation property of our chess piece, which changes the position of the object.
It is a property of type TVector3. TVector3 is an advanced record in Castle Game Engine that represents 3D vector — in this case a position, but we use it in many other cases too, e.g. to represent a direction or even RGB color. There are a number of useful things defined to help you work with TVector3, in particular:
-
Vector3(…)function returns a newTVector3value with given coordinates. -
The arithmetic operators like
+work withTVector3values.
This means that we can easily move object by writing a code like this:
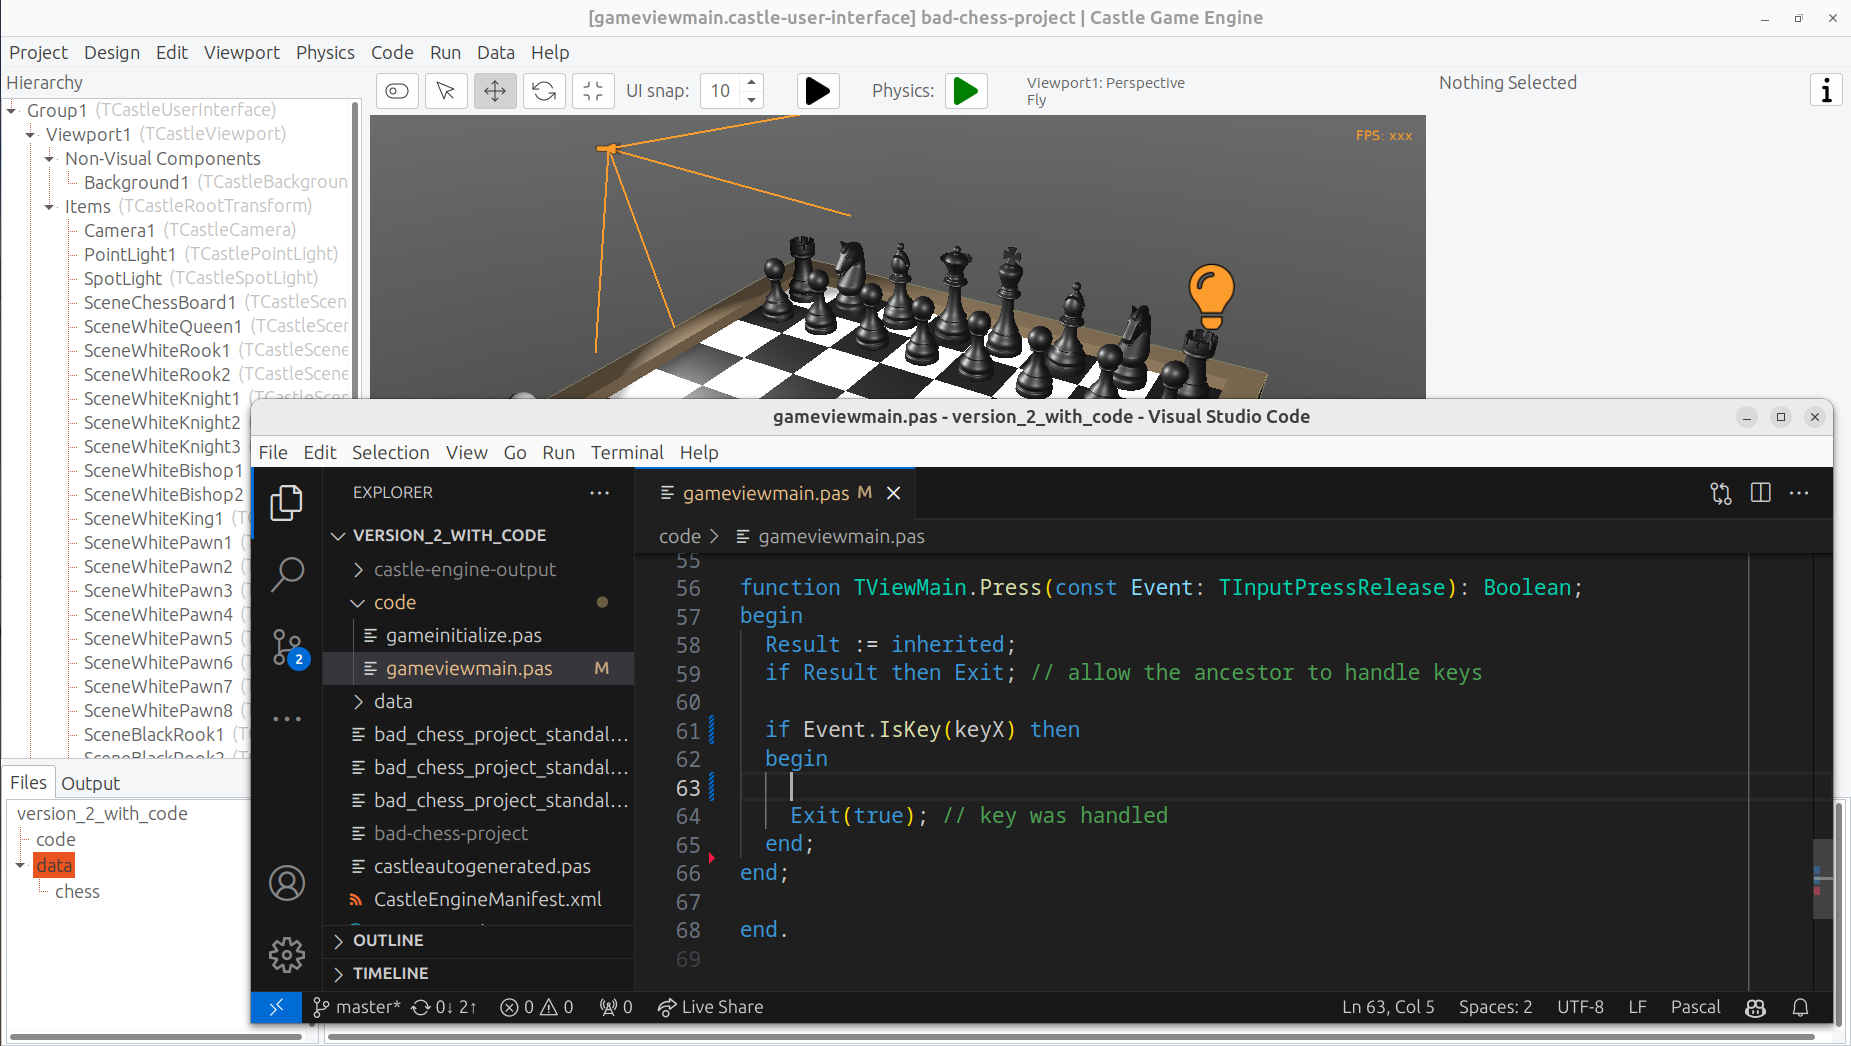
SceneBlackKing1.Translation := SceneBlackKing1.Translation + Vector3(0, 1, 0);Where to put this statement? In general, you can use this code anywhere in your view (as long as it executes only after the view has been started). In this case, we want to react to user pressing a key x. To achieve this, we can edit the TViewMain.Press method in the view. The empty implementation of this method is already present, with some helpful comments, so we can just fill it with our code:
function TViewMain.Press(const Event: TInputPressRelease): Boolean;
begin
  Result := inherited;
  if Result then Exit; // allow the ancestor to handle keys

  if Event.IsKey(keyX) then
  begin
    SceneBlackKing1.Translation := SceneBlackKing1.Translation + Vector3(0, 1, 0);
    Exit(true); // key was handled
  end;
end;
Build and run the game (e.g. by pressing F9 in Castle Game Engine editor, or in Delphi, or in Lazarus) and press X to see how it works.
3.2. Push the chess piece using physics
Let’s do one more exercise. Let’s make sure we can use code to push (flick, throw) a chess piece using physics. The chess piece we push, and the direction in which we push it, will be hardcoded in this exercise. But we will get confidence that we can use physics from Pascal code.
Let’s use the black king again.
To do this, make sure to add the physics components to the relevant chess piece. We described how to do this in 1st article part, the quick recap is to right-click on the component (SceneBlackKing1 in this case) and from the context menu choose "Add Behavior → Physics → Collider → Box (TCastleBoxCollider)". Make sure you also have physics (with TCastleMeshCollider) active on the chess board, otherwise the chess piece would fall down due to gravity as soon as you run the game.
This is how it should look like:

To push it using physics, we want to use the ApplyImpulse method of the TCastleRigidBody component associated with the chess piece.
-
You can get the
TCastleRigidBodycomponent using theSceneBlackKing1.FindBehavior(TCastleRigidBody)method, as shown below.Alternatively, you could also declare and access
RigidBody1: TCastleRigidBodyreference in the published section of your view. We don’t show this approach here, just because using theFindBehaviorseems more educational at this point, i.e. you will find theFindBehavioruseful in more situations. -
The
ApplyImpulsemethod takes two parameters: the direction of the impulse (asTVector3; length of this vector determines the impulse strength) and the position from which the impulse comes (it is simplest to just use the chess piece position here).
In the end, this is the modified version of TViewMain.Press that you should use:
function TViewMain.Press(const Event: TInputPressRelease): Boolean;
var
  MyBody: TCastleRigidBody;
begin
  Result := inherited;
  if Result then Exit; // allow the ancestor to handle keys

  if Event.IsKey(keyX) then
  begin
    MyBody := SceneBlackKing1.FindBehavior(TCastleRigidBody) as TCastleRigidBody;
    MyBody.ApplyImpulse(Vector3(0, 10, 0), SceneBlackKing1.WorldTranslation);
    Exit(true); // key was handled
  end;
end;
Above we use the direction Vector3(0, 10, 0) which means "up, with strength 10". You can experiment with different directions and strengths. If we’d like to push the chess piece horizontally we would use a direction with non-zero X and/or Z values, and leave Y axis zero.
To the uses clause, add also CastleTransform unit, to have TCastleRigidBody class defined.
As usual, run the game and test. Pressing X should now bump the chess piece up.
You can press X repeatedly, even when the chess piece is already in the air. As you can see in the code — we don’t secure from it, so we allow to push an object that is already flying. We will not cover it in this exercise, but you could use MyBody.PhysicsRayCast to cast a ray with direction Vector3(0, -1, 0) and see whether the chess piece is already in the air.
4. Make code aware "what is a chess piece" using behaviors
To implement our desired logic, the code has to somehow know "what is a chess piece". So far, our 3D world is a collection of TCastleScene components, but it does not give us enough information to distinguish between chess pieces and other objects (like a chessboard). We want to do something crazy, but we don’t want to flip the chessboard! At least not this time :)
To "mark" that the given TCastleScene component is a chess pieces we will invent a new class called TChessPieceBehavior descending from the TCastleBehavior class. We will then attach instances of this class to the TCastleScene components that represent chess pieces. In the future this class can have more fields (holding information specific to this chess piece) and methods. For start, the mere existence of TCastleBehavior instance attached to a scene indicates "this is a chess piece".
To know more about how our behaviors work, see https://castle-engine.io/behaviors for documentation and examples. You can also create a new project from the "3D FPS Game" template and see how the TEnemy class (descendant of TCastleBehavior) is defined and used. The behaviors are a very flexible concept to add information and mechanics to your world and we advise to use them in many situations.
There’s really nothing difficult about our initial TChessPieceBehavior definition. It is almost an empty class. I decided to only add there a Boolean field that says whether the chess piece is white or black:
type
  TChessPieceBehavior = class(TCastleBehavior)
  public
    Black: Boolean;
  end;
You can declare it at the beginning of the interface section of unit GameViewMain. Though larger behavior classes may deserve to be placed in their own units.
How to attach the behavior instances to the scenes?
-
You could do this visually, by registering the
TChessPieceBehaviorclass in the Castle Game Engine editor.This is a very powerful method as it allows to visually add and configure the behavior properties. See the https://castle-engine.io/custom_components for description how to use this.
-
Or you can do it from code. In this article, I decided to go with this approach.
This is a bit easier if you have to effectively attach the behavior 32 times, to all the chess pieces, and there’s no need to specifically configure the initial state of the behavior. Clicking 32 times "Add Behavior" would be a bit tiresome and also unnecessary in our simple case (for this demo, all chess pieces really work the same), so let’s instead utilize code to easily initialize the chess pieces.
To attach a behavior to our SceneBlackKing1, we would just create the instance of TChessPieceBehavior in our views’s Start method, and add using SceneBlackKing1.AddBehavior. Like this:
procedure TViewMain.Start;
var
  ChessPiece: TChessPieceBehavior;
begin
  inherited;
  ChessPiece := TChessPieceBehavior.Create(FreeAtStop);
  ChessPiece.Black := true;
  SceneBlackKing1.AddBehavior(ChessPiece);
end;
But this is not good enough for our application. Above we added TChessPieceBehavior to only one chess piece. We want to add it to all 32 the chess pieces. How to do it easily? We need to somehow iterate over all the chess pieces. And to set the Black boolean field, we also should somehow know whether this is black or white piece. There are multiple solutions:
-
We could assume that all chess pieces have names like
SceneWhiteXxxorSceneBlackXxx. Then we can iterate overViewport1.Itemschildren, and check if theirNamestarts with given prefix. -
Or we could look at
Tagvalue of scenes, and have a convention e.g. thatTag = 1means black chess piece,Tag = 2means white chess piece, and other tags (Tag = 0is default, in particular) mean that this is not a chess piece. -
We could also introduce additional transformation components that group black chess pieces separately from white chess pieces and separately from other stuff (like a chessboard).
I decided to go with the latter approach, as introduction of "additional TCastleTransform components to group existing ones" is a powerful mechanism in many other situations. E.g. you can then easily hide or show a given group (using TCastleTransform.Exists) property.
To make this happen, right-click on Viewport1.Items, and choose from the context menu "Add Transform → Transform (TCastleTransform)".
Name this new component BlackPieces. Then drag-and-drop in the editor hierarchy all the black chess pieces (SceneBlackXxx components) to be children of BlackPieces. You can easily select all 16 scenes representing black pieces in the hierarchy by holding the Shift key and then drag-and-drop them all at once into BlackPieces.
The end result should look like this in the hierarchy:
Don’t worry that only the SceneBlackKing1 has the physics components. We will set the physics components using code soon too.
Now repeat the process to add a WhitePieces group.
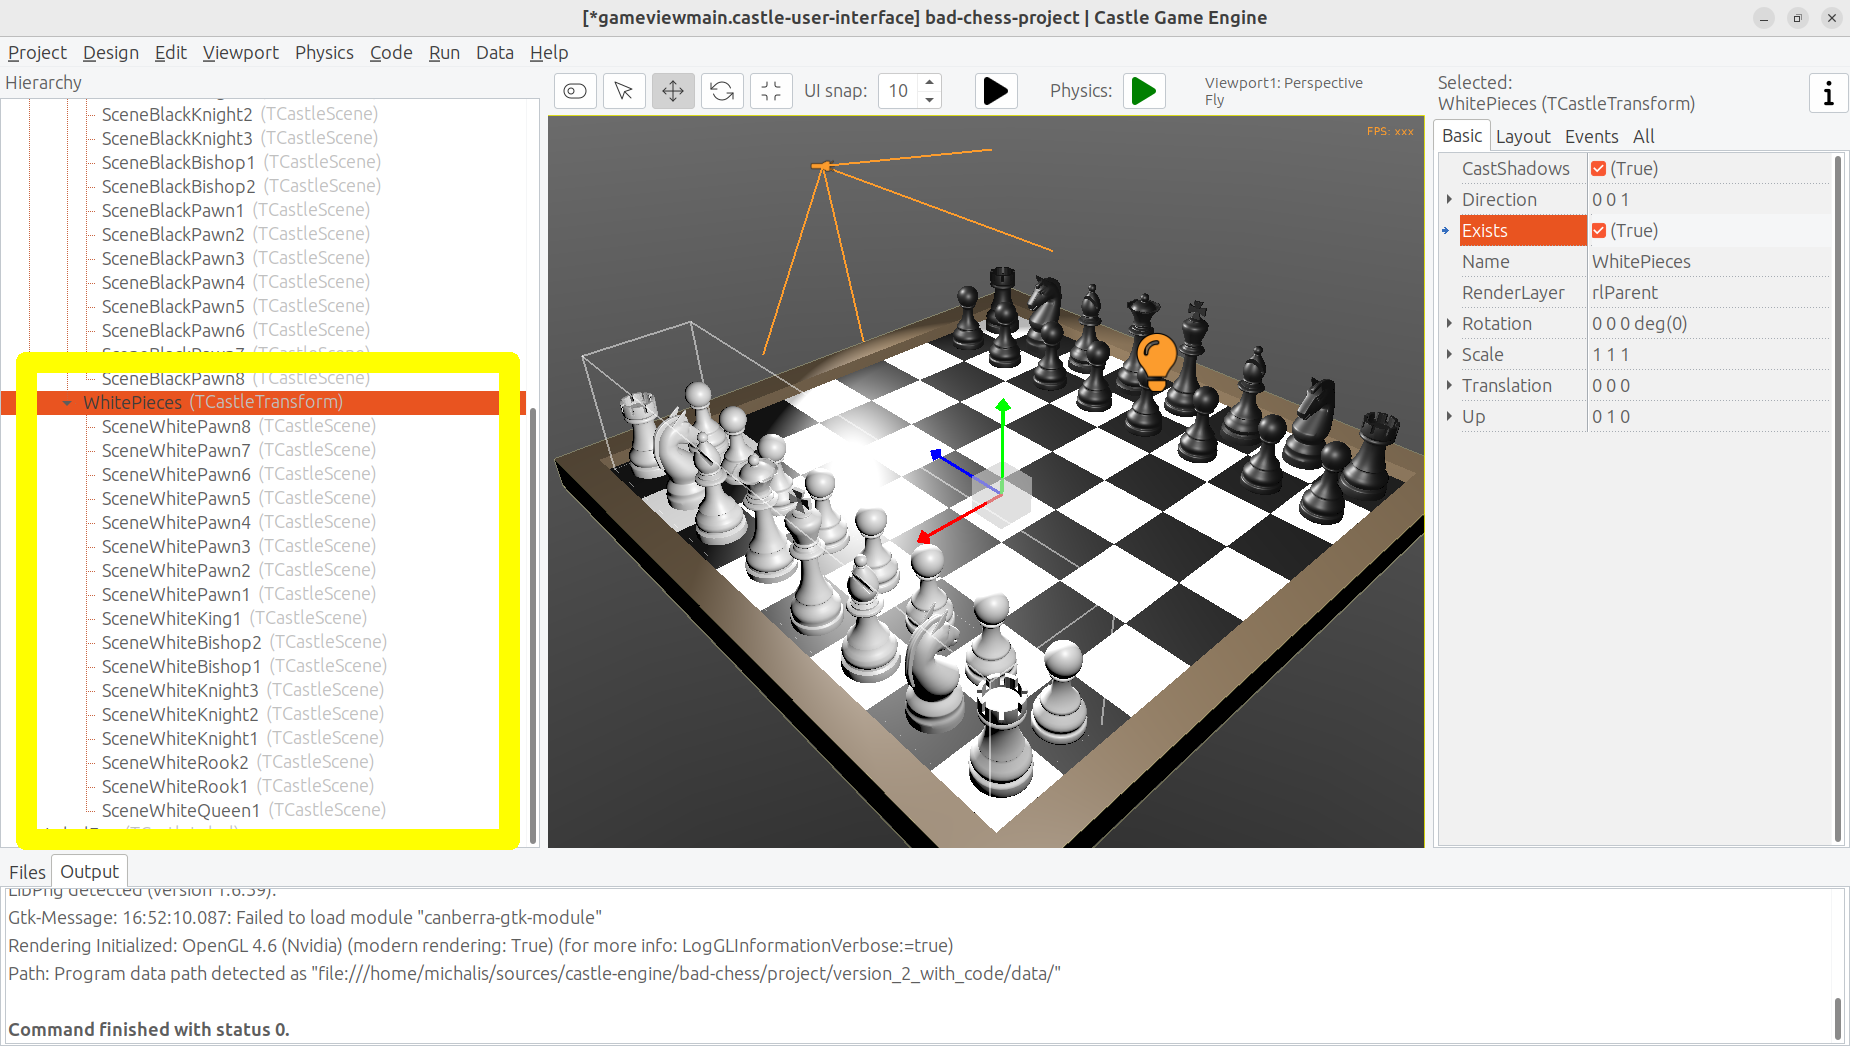
This preparation in the editor makes our code task easier. Add to the published section of TViewMain declaration of BlackPieces and WhitePieces fields, of type TCastleTransform:
  TViewMain = class(TCastleView)
  published
    ... // keep other fields too
    BlackPieces, WhitePieces: TCastleTransform;
Now iterate over the 2 chess pieces' groups in the Start method:
procedure TViewMain.Start;

  procedure ConfigureChessPiece(const Child: TCastleTransform; const Black: Boolean);
  var
    ChessPiece: TChessPieceBehavior;
  begin
    ChessPiece := TChessPieceBehavior.Create(FreeAtStop);
    ChessPiece.Black := Black;
    Child.AddBehavior(ChessPiece);
  end;

var
  Child: TCastleTransform;
begin
  inherited;
  for Child in BlackPieces do
    ConfigureChessPiece(Child, true);
  for Child in WhitePieces do
    ConfigureChessPiece(Child, false);
end;
It seems prudent to add basic "sanity check" at this point. Let’s log the number of chess pieces each side has. Add the following code and the end of the Start method:
WritelnLog('Configured %d black and %d white chess pieces', [
  BlackPieces.Count,
  WhitePieces.Count
]);
To make WritelnLog available, add CastleLog unit to the uses clause. Now when you run the game, you should see a log
Configured 16 black and 16 white chess piecesOn my first run, I actually saw that I have 17 chess pieces on each side by accident. I mistakenly added 3 knights instead of 2 (one knight was at exactly the same position as another, so it wasn’t obvious). I have removed the excessive knight pieces thanks to this log. Detecting such mistakes is exactly the reason why we add logs and test — so I encourage you to do it too.
While we’re at it, we can also use this opportunity to make sure all chess pieces have physics components (TCastleRigidBody and TCastleBoxCollider). So you don’t need to manually add them all. This is a reasonable approach if the components don’t need any manual adjustment per-chess-piece.
To do this, extend our ConfigureChessPiece method:
  procedure ConfigureChessPiece(const Child: TCastleTransform; const Black: Boolean);
  begin
    ... // keep previous code too
    if Child.FindBehavior(TCastleRigidBody) = nil then
      Child.AddBehavior(TCastleRigidBody.Create(FreeAtStop));
    if Child.FindBehavior(TCastleCollider) = nil then
      Child.AddBehavior(TCastleBoxCollider.Create(FreeAtStop));
  end;
As you see above, this approach is quite direct: if you don’t have the necessary component, just add it. We don’t bother to configure any property on the new TCastleRigidBody and TCastleBoxCollider instances, as their defaults are good for our purpose.
This was all a good "ground work" for the remaining article part. Nothing functionally new has actually happened in our game, you should run it and see that… nothing changed. All 32 chess pieces just stand still, at the beginning.
5. Selecting 3D object using the mouse
5.1. Highlight the chess piece under mouse and allow selecting it
To implement the real interaction, we want to allow user to choose which chess piece to flick using the mouse. Castle Game Engine provides a ready function that tells you what is being indicated by the current mouse (or last touch, on mobile) position. This is the TCastleViewport.TransformUnderMouse function.
For start, make sure to declare the viewport instance in the published section of class TViewMain, like this:
MainViewport: TCastleViewport;Match the name of your viewport in the design. Add unit CastleViewport to the uses clause to make type TCastleViewport known.
Let’s utilize it to highlight the current chess piece at the mouse position. We can just keep checking the MainViewport.TransformUnderMouse value in each Update call.
Note: Alternatively, we could check MainViewport.TransformUnderMouse in each Motion call, that occurs only when mouse (or touch) position changes. But doing it in Update is a bit better: as we use physics, some chess pieces may still be moving due to physics, so the chess piece under the mouse may change even if the mouse position doesn’t change.
To actually show the highlight, we will use a ready effect available for every TCastleScene that can be activated by setting MyScene.RenderOptions.WireframeEffect to something else than weNormal. This is the simplest way to show the highlight (we discuss other ways in later section).
Before we jump into code, I encourage to experiment with perfect settings of RenderOptions for highlight in the editor. Just edit any chosen chess piece, until it seems to have a pretty highlight, and remember the chosen options. The most useful properties to adjust are WireframeEffect, WireframeColor, LineWidth, SilhouetteBias, SilhouetteScale. You can see them emphasized below — editor shows properties which have non-default values using the bold font.

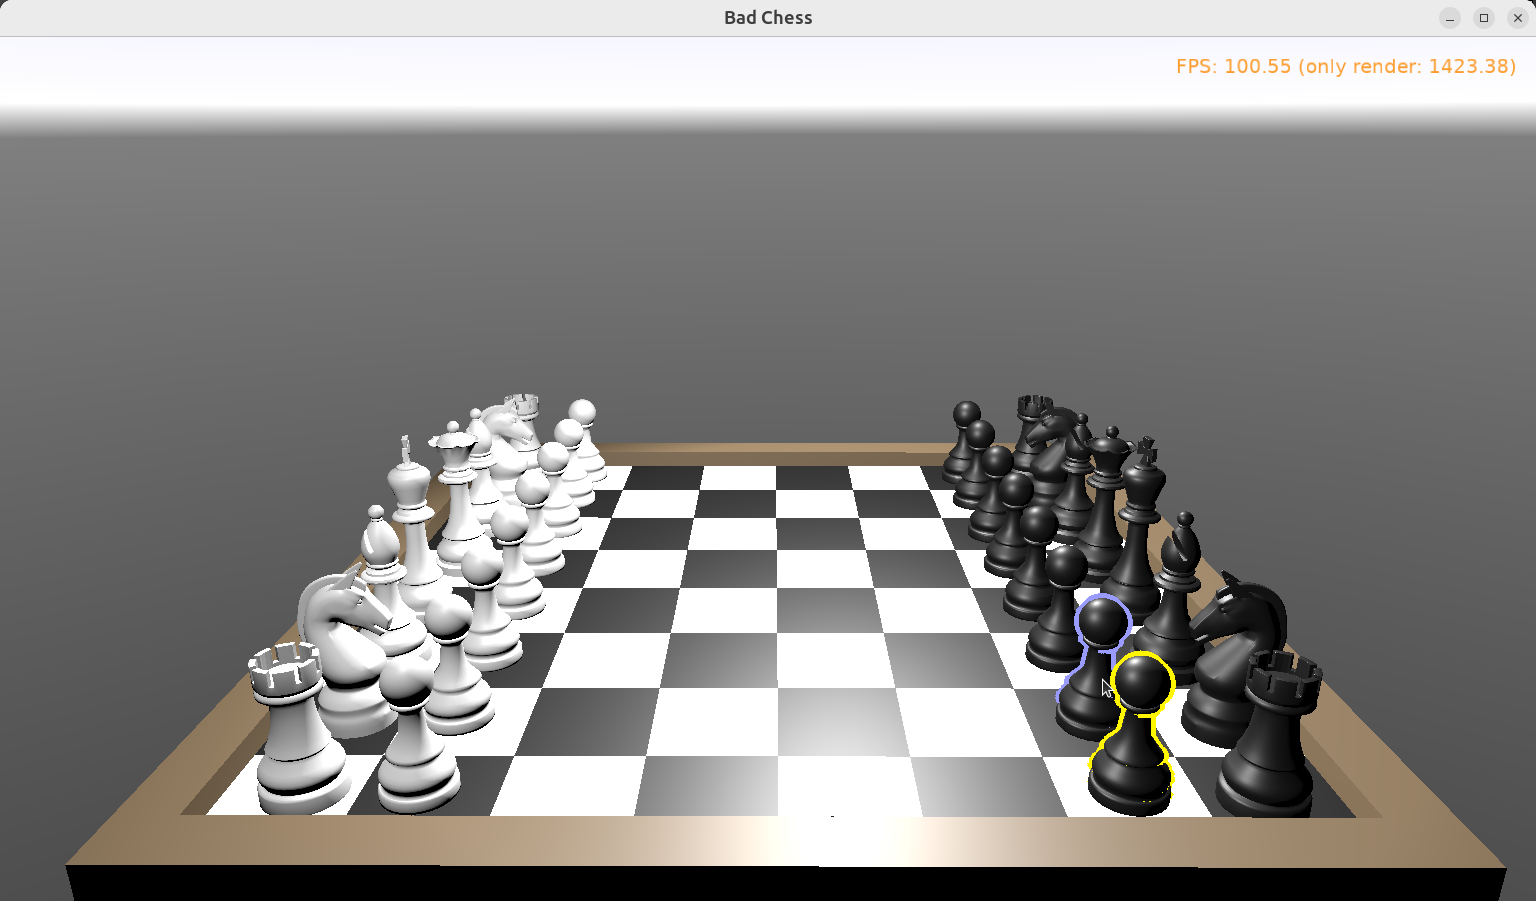
I decided to show the currently highlighted (at mouse position) chess piece with a light-blue wireframe. This chess piece is also set as the value of private field ChessPieceHover.
Moreover, once user clicks with mouse (we can detect it in Press) the chess piece is considered selected and gets a yellow highlight. This chess piece is set as ChessPieceSelected value.
Remembering the ChessPieceHover and ChessPieceSelected values is useful for a few things. For one thing, we can later disable the effect (when the piece is no longer highlighted or selected). And it will allow to flick the ChessPieceSelected in the next sections.
We could store them as references to TCastleScene or TChessPieceBehavior. That is, we could declare:
-
Either
ChessPieceHover, ChessPieceSelected: TChessPieceBehavior;… -
…or
ChessPieceHover, ChessPieceSelected: TCastleScene;
Both declarations would be good for our application. That is, we have to choose one or the other as it will imply a bit different code, but the differences are really minor. In the end, we can always get TChessPieceBehavior instance from a corresponding TCastleScene (if we know it is a chess piece) and we can get TCastleScene from a TChessPieceBehavior.
-
To get
TChessPieceBehaviorfrom the correspondingTCastleSceneyou would do:var MyBehavior: TChessPieceBehavior; MyScene: TCastleScene; begin ... MyBehavior := MyScene.FindBehavior(TChessPieceBehavior) as TChessPieceBehavior; -
To get
TCastleScenefrom correspondingTChessPieceBehavioryou would do:var MyBehavior: TChessPieceBehavior; MyScene: TCastleScene; begin ... MyScene := MyBehavior.Parent as TCastleScene;
I decided to declare them as TChessPieceBehavior. If you want to follow my approach exactly, add this to the private section of class TViewMain:
ChessPieceHover, ChessPieceSelected: TChessPieceBehavior;
{ Turn on / off the highlight effect, depending on whether
  Behavior equals ChessPieceHover, ChessPieceSelected or none of them.
  This accepts (and ignores) Behavior = nil value. }
procedure ConfigureEffect(const Behavior: TChessPieceBehavior);
Then add CastleColors unit to the uses clause (of interface or implementation of unit GameViewMain, doesn’t matter in this case) to define HexToColorRGB utility.
Finally this is the code of new Update, Press and helper ConfigureEffect methods:
procedure TViewMain.ConfigureEffect(const Behavior: TChessPieceBehavior);
var
  Scene: TCastleScene;
begin
  if Behavior = nil then
    Exit;
  { Behavior can be attached to any TCastleTransform.
    But in our case, we know TChessPieceBehavior is attached to TCastleScene. }
  Scene := Behavior.Parent as TCastleScene;
  if (Behavior = ChessPieceHover) or
     (Behavior = ChessPieceSelected) then
  begin
    Scene.RenderOptions.WireframeEffect := weSilhouette;
    if Behavior = ChessPieceSelected then
      Scene.RenderOptions.WireframeColor := HexToColorRGB('FFEB00')
    else
      Scene.RenderOptions.WireframeColor := HexToColorRGB('5455FF');
    Scene.RenderOptions.LineWidth := 10;
    Scene.RenderOptions.SilhouetteBias := 20;
    Scene.RenderOptions.SilhouetteScale := 20;
  end else
  begin
    Scene.RenderOptions.WireframeEffect := weNormal;
  end;
end;

procedure TViewMain.Update(const SecondsPassed: Single; var HandleInput: Boolean);
var
  OldHover: TChessPieceBehavior;
begin
  inherited;

  LabelFps.Caption := 'FPS: ' + Container.Fps.ToString;

  OldHover := ChessPieceHover;

  if MainViewport.TransformUnderMouse <> nil then
  begin
    ChessPieceHover := MainViewport.TransformUnderMouse.FindBehavior(TChessPieceBehavior)
      as TChessPieceBehavior;
  end else
    ChessPieceHover := nil;

  if OldHover <> ChessPieceHover then
  begin
    ConfigureEffect(OldHover);
    ConfigureEffect(ChessPieceHover);
  end;
end;

function TViewMain.Press(const Event: TInputPressRelease): Boolean;
var
  MyBody: TCastleRigidBody;
  OldSelected: TChessPieceBehavior;
begin
  Result := inherited;
  if Result then Exit; // allow the ancestor to handle keys

  // ... if you want, keep here the handling of keyX from previous exercise

  if Event.IsMouseButton(buttonLeft) then
  begin
    OldSelected := ChessPieceSelected;
    if (ChessPieceHover <> nil) and
       (ChessPieceHover <> ChessPieceSelected) then
    begin
      ChessPieceSelected := ChessPieceHover;
      ConfigureEffect(OldSelected);
      ConfigureEffect(ChessPieceSelected);
    end;
    Exit(true); // mouse click was handled
  end;
end;
As always, remember to compile and run the code to make sure it works OK!
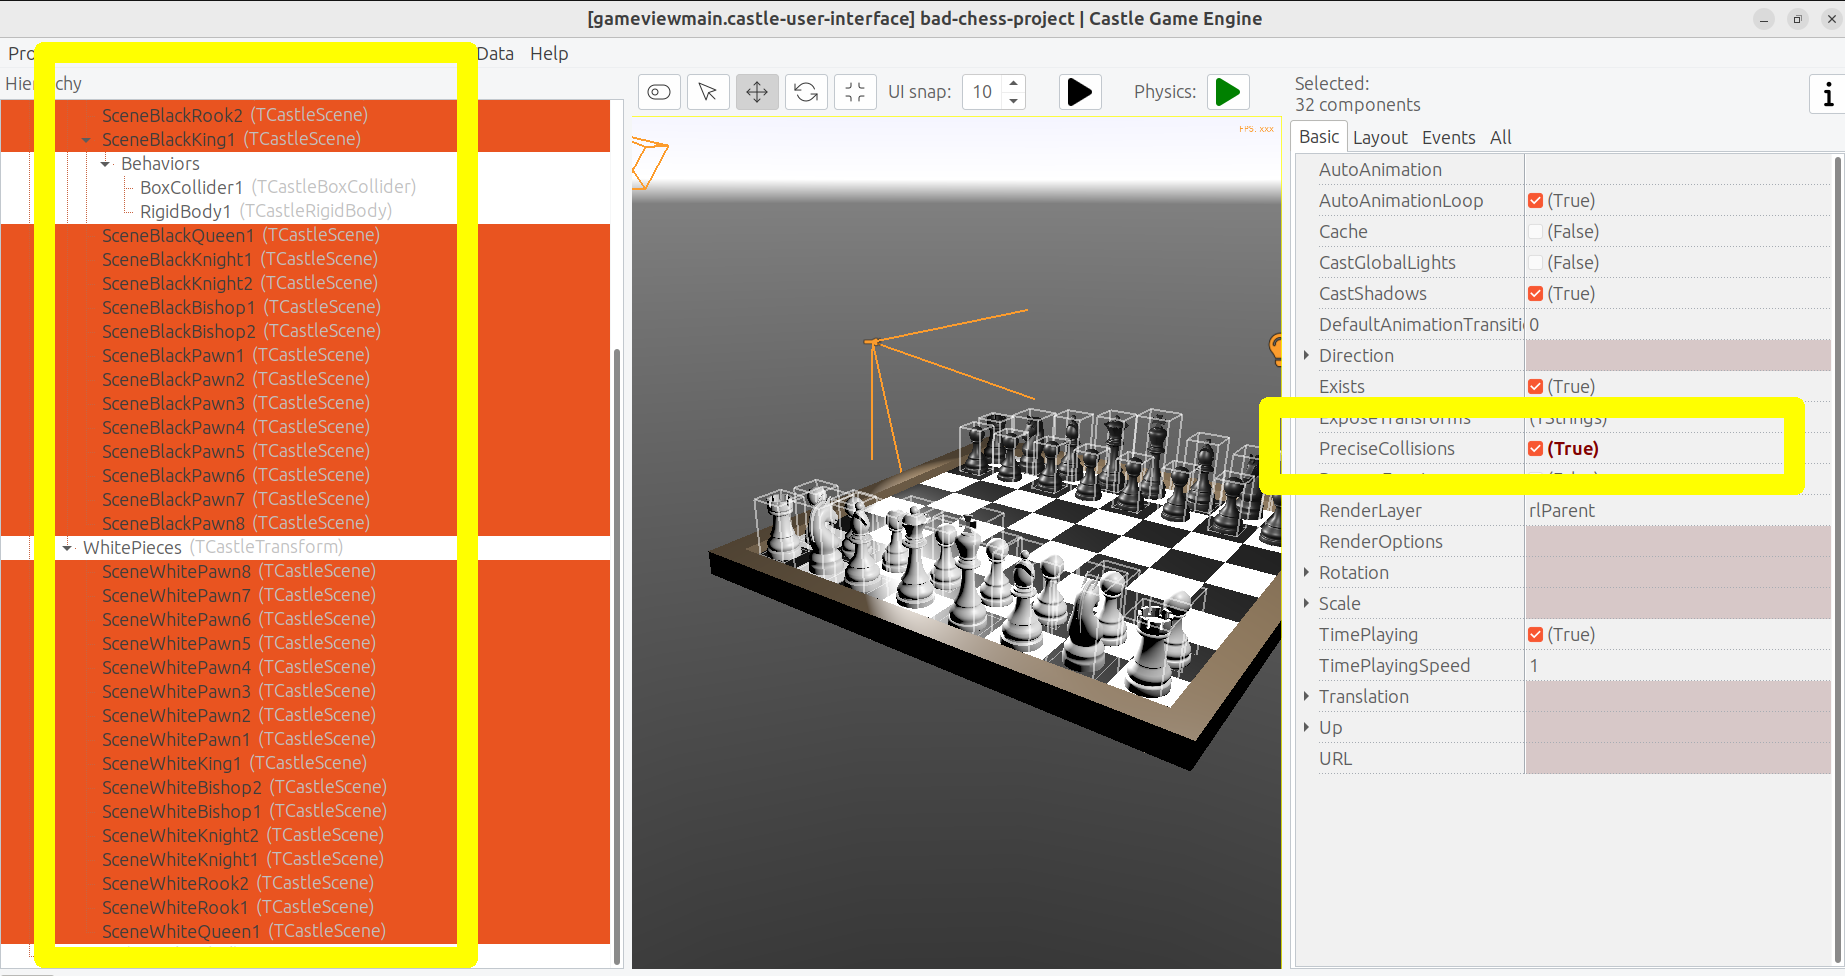
You will notice that MainViewport.TransformUnderMouse detects what is under the mouse, but treating each chess piece as a box. So the detection is visibly not accurate. To fix this, set PreciseCollisions to true on all the chess pieces. You can do this easily by selecting all chess pieces in editor using Shift or Ctrl and then toggling PreciseCollisions in the Object Inspector.
I decided to move the camera at this point too (to show both sides, black and white, from a side view).
5.2. Sidenote: Other ways to show a highlight
There are other ways to show the highlighted (or selected) chess piece.
-
Dynamically changing the material color. Do this by accessing an instance of
TPhysicalMaterialNodewithin the scene’s nodes (TCastleScene.RootNode) and changing theTPhysicalMaterialNode.BaseColor. See e.g. engine exampleexamples/viewport_and_scenes/collisions/that uses this. -
Dynamically enabling / disabling a shader effect. This means adding
TEffectNodeandTEffectPartNodenodes to the scene and implementing the effect using GLSL (OpenGL Shading Language). Seehttps://castle-engine.io/shadersabout this. -
Adding a additional box that surrounds chosen object. The CGE editor itself uses this technique to show highlighted / selected 3D objects. Use
TDebugTransformBoxclass to implement this easily.
If you are curious, hopefully the above information and examples will point you in the right direction.
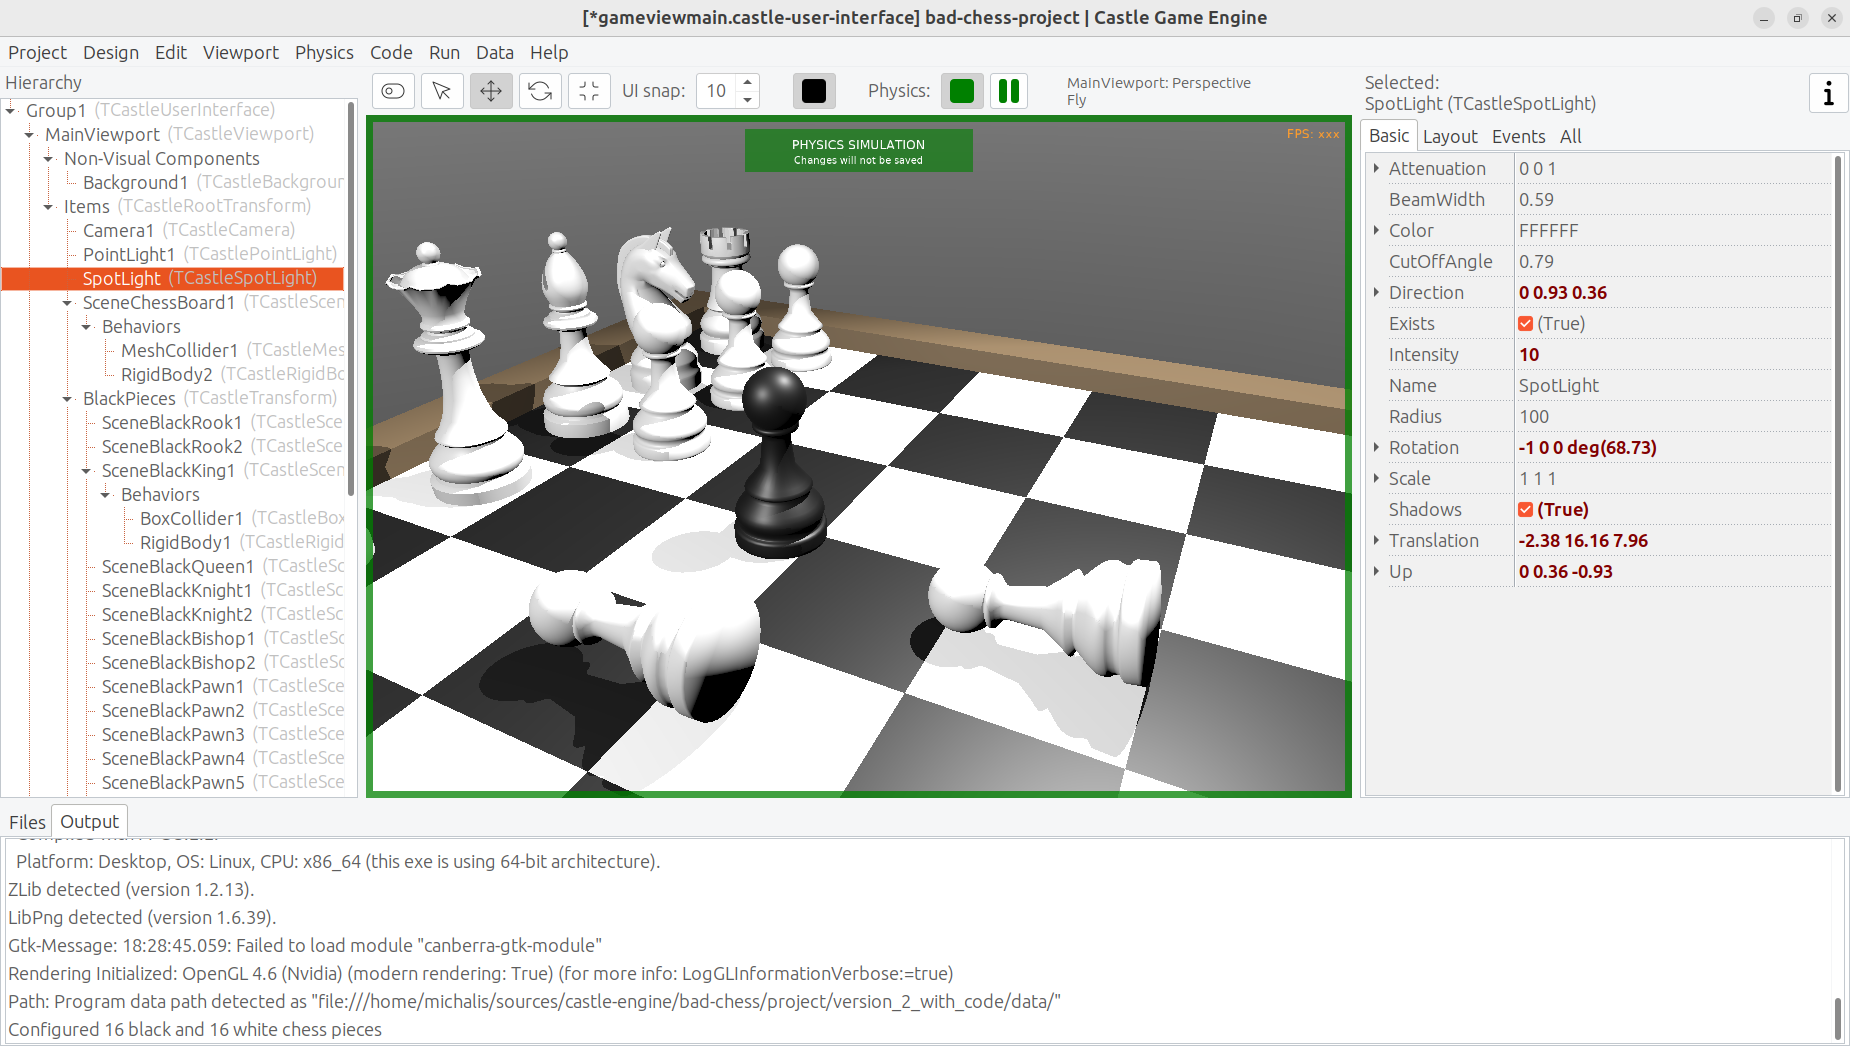
5.3. Sidenote: Shadows
I decided to activate shadows at this point. Just set Shadows to true on the main light source. Moreover, set RenderOptions.WholeSceneManifold to true at the chess pieces. This should make everything cast nice shadows. The shadows are dynamic which means that they will properly change when we will move the chess pieces.
See https://castle-engine.io/shadow_volumes for more information about shadows in Castle Game Engine.
6. Let user choose the angle and strength to flick the chess piece
Once the user has picked a chess piece, we want to allow configuring the direction and strength with which to flick the chosen object. We already know that "flicking" the chess piece technically means "applying a physics force to the rigid body of a chosen chess piece". We have almost everything we need, but we need to allow user to choose the direction and strength of this force.
6.1. Designing a 3D arrow
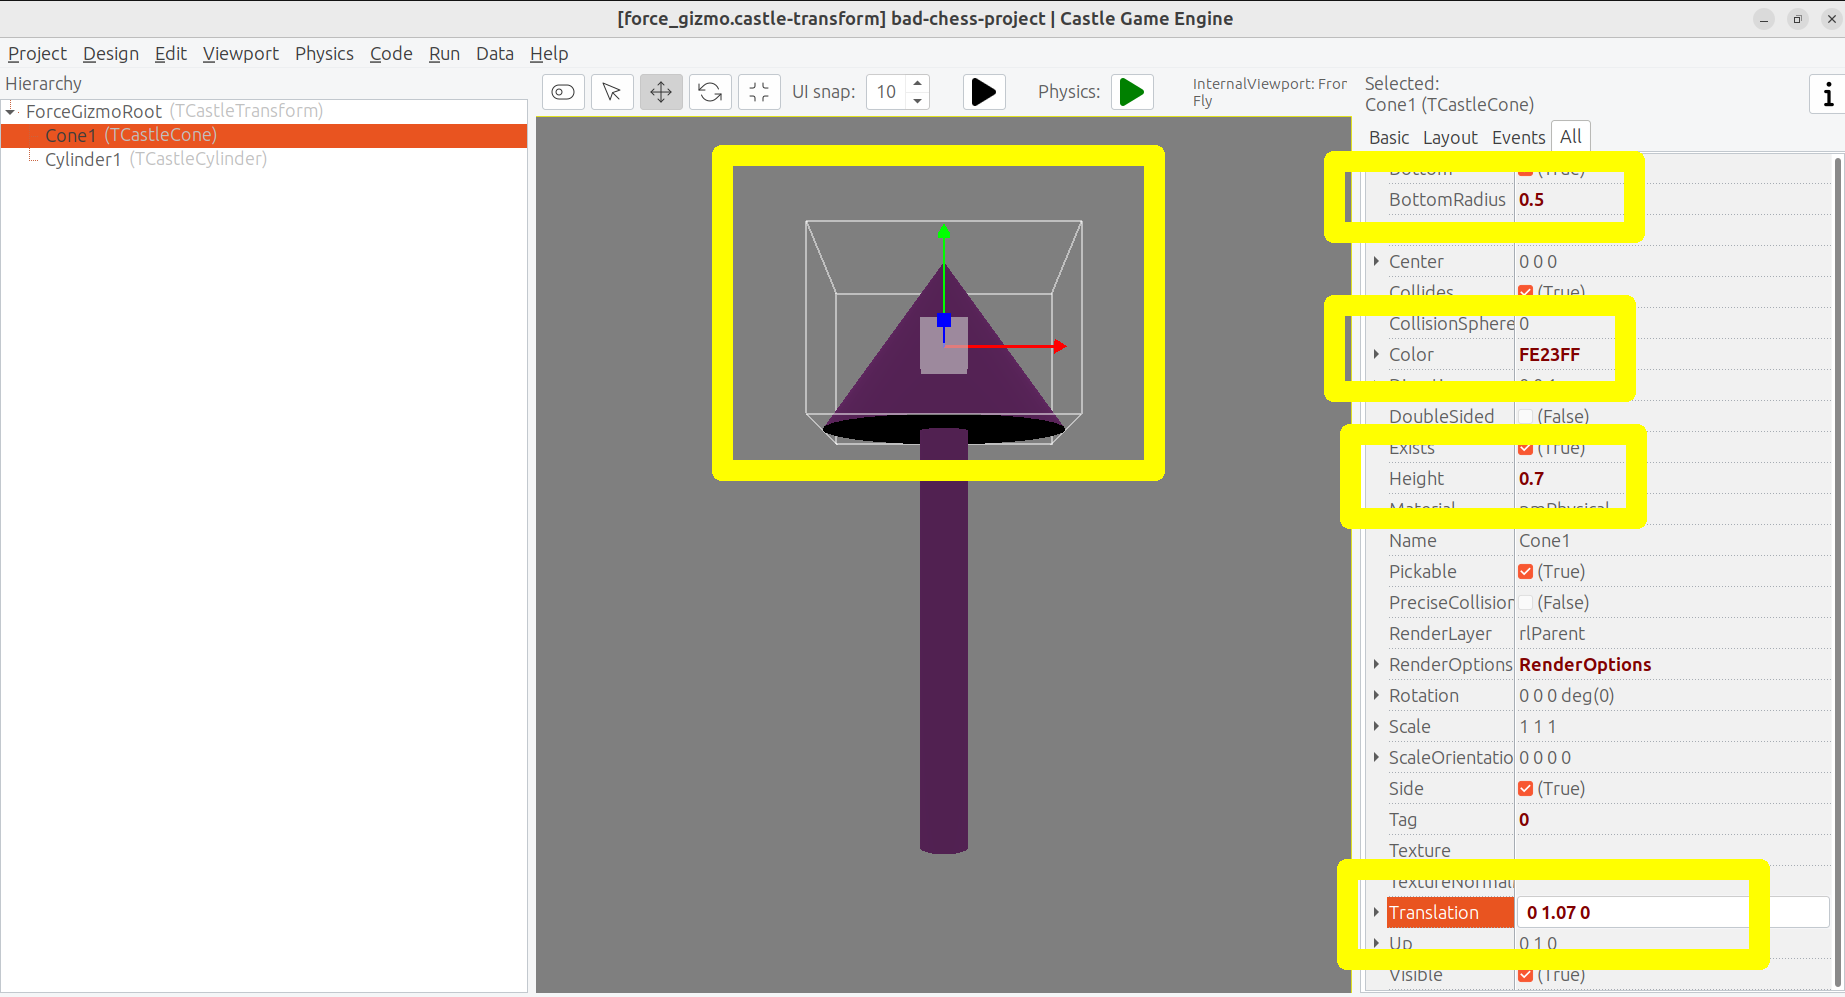
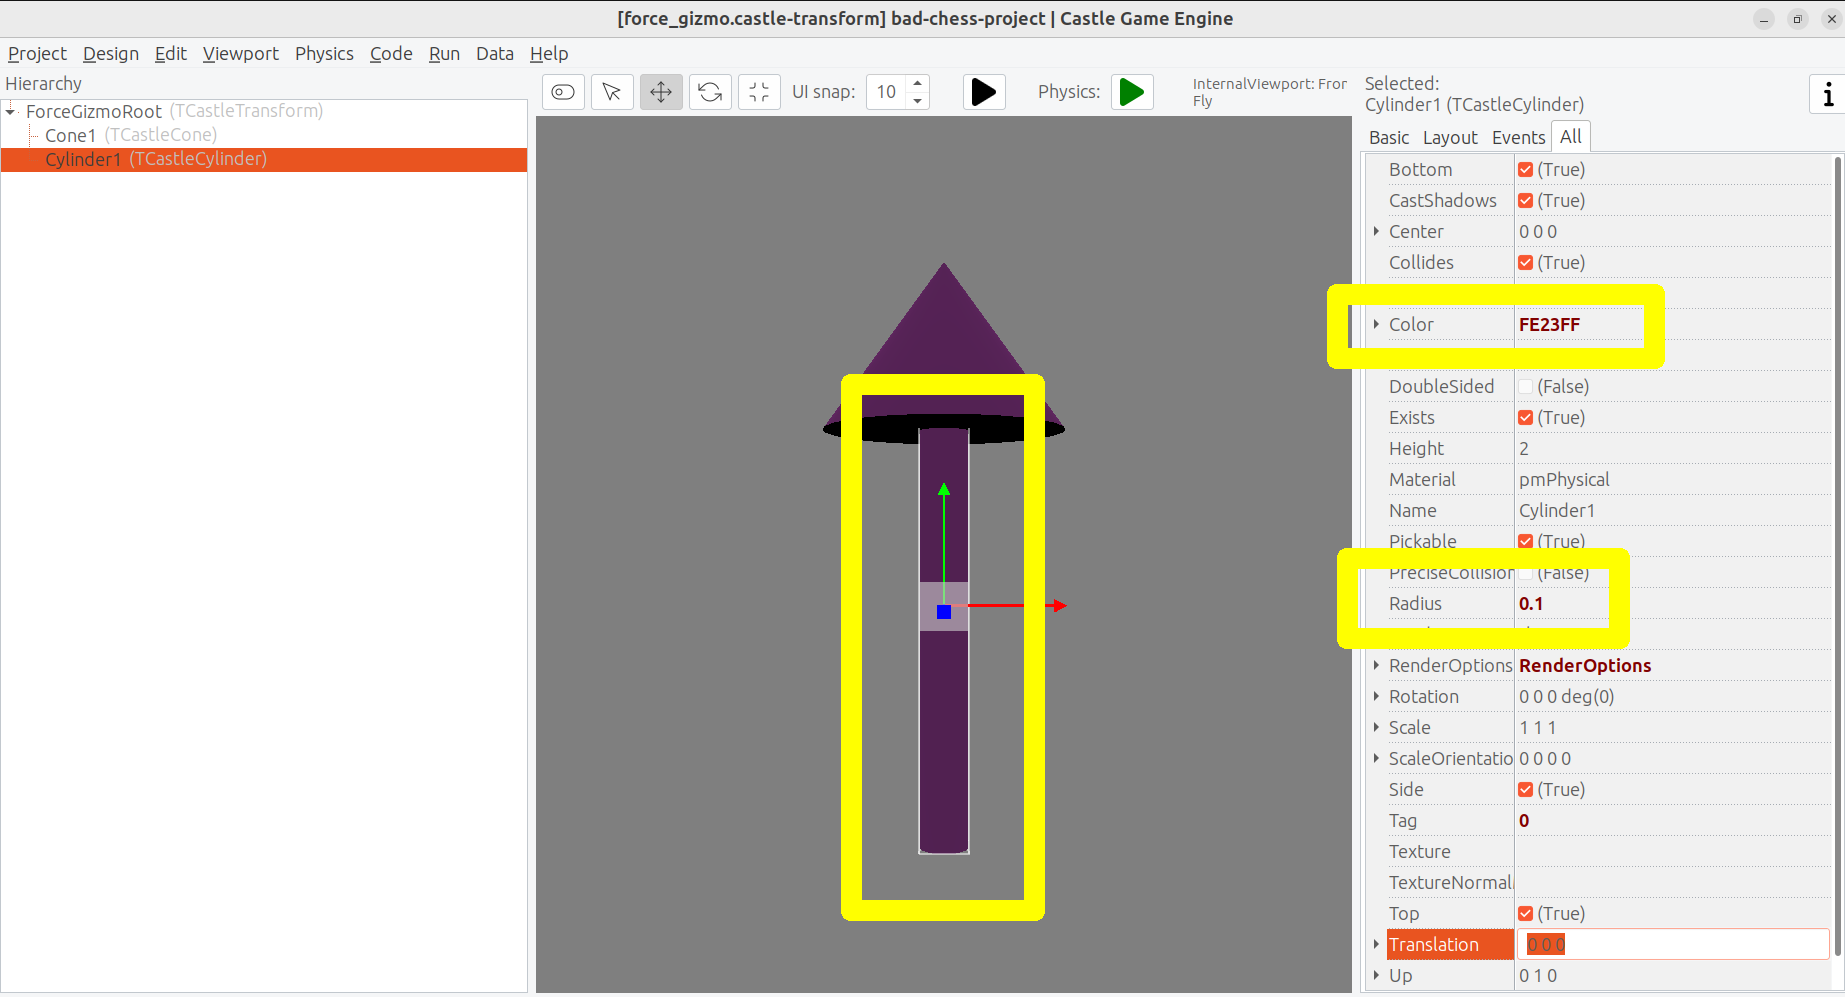
To visualize the desired force we will use a simple 3D arrow model, that will be rotated and scaled accordingly. While we could design such model in Blender or other 3D authoring software, in this case it’s easiest to just do it completely in the Castle Game Engine editor. The arrow is a composition of two simple shapes: cone (for the arrow tip) and a cylinder.
Moreover let’s design the arrow independently, as a separate design. The new design will contain a hierarchy of components, with the root being TCastleTransform. We will save it as a file force_gizmo.castle-transform in the project data subdirectory. Then we will add it to the main design (gameviewmain.castle-user-interface), and toggle the existence, rotation and scale of the visualized force.
Using a separate design file for the 3D arrow, while not strictly necessary in this case, is a powerful technique. When something is saved as a separate design file, you can reuse it freely, and instantiate it many times (at design-time, or by dynamically spawning during the game run-time). This is e.g. how to have creatures in your game: 3D objects that share common logic and that can be spawned whenever needed.
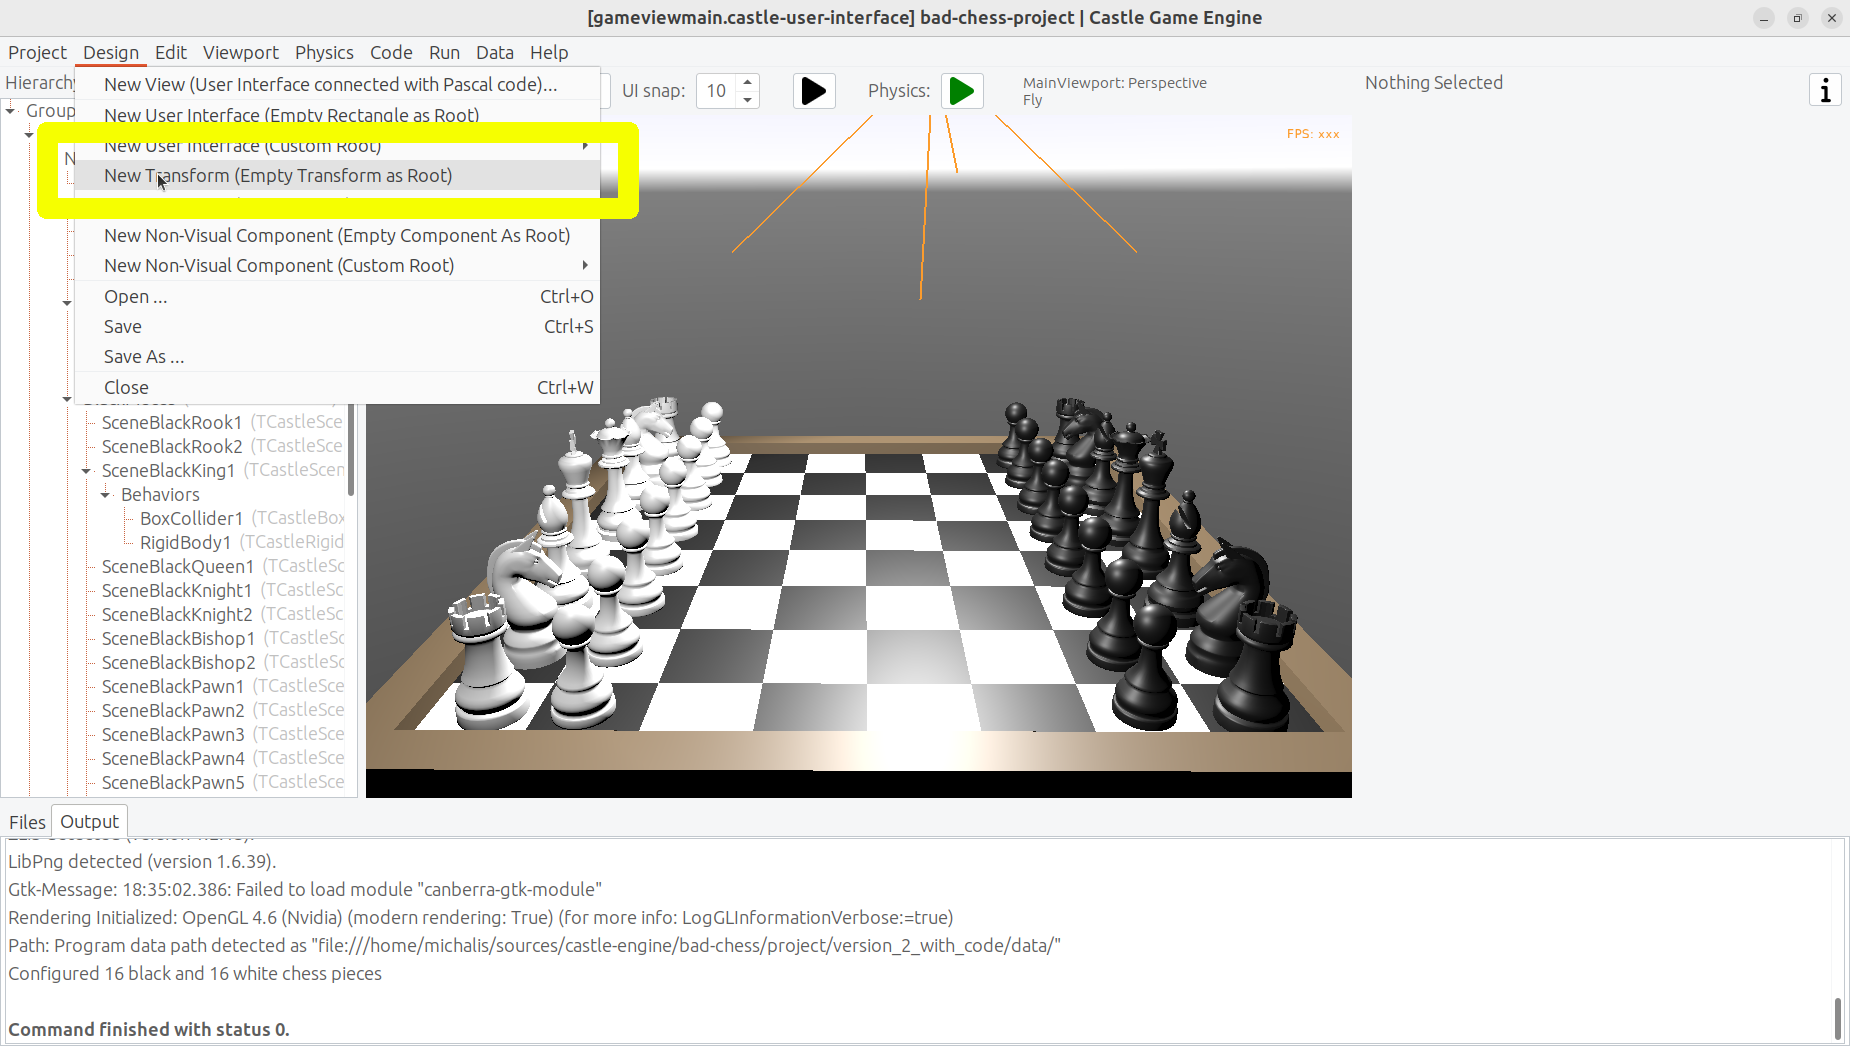
To start designing the arrow, choose editor menu item "Design → New Transform (Empty Transform as Root)".
Underneath, add two components: TCastleCylinder and TCastleCone.
Adjust their Height, Radius (on cylinder), BottomRadius (on cone) and Translation to form a nice 3D arrow.
Adjust their Color to something non-default to make things prettier. Remember that the arrow will later be lit by the lights we have set up in the main design (gameviewmain.castle-user-interface), so it will probably be brighter than what you observe now.
You can follow the values I chosen on the screenshots below, but really these are just examples. Go ahead and create your own 3D arrow as you please.
Now comes a bit difficult part. We want to have an arrow that can easily rotate around a dummy box (in the actual game, it will rotate around a chess piece). Ideally, an arrow should also easily scale to visualize the force strength. I use the words easily to emphasize that we don’t want to only rotate it in the editor, but we will also have to allow user to rotate it during the game. So the rotation and scale that are interesting to us must be very easy to get and set from code.
To do this, first add a dummy box representing a chess piece. I called it DebugBoxToBeHidden and set Size of the box to 2 3 2 to account for tall (large Y axis) chess pieces. Later we will make the box hidden by setting its Exists property to false.
Once you have a box, you want to add intermediate TCastleTransform components to
-
rotate the arrow (cone and cylinder) to be horizontal
-
move the arrow away from the box
-
rotate the arrow around the box
-
scale the arrow.
There are multiple valid ways of achieving this. The key advise is to not hesitate to make a nested composition, that is place TCastleTransform within another TCastleTransform within another TCastleTransform and so on. Let each TCastleTransform perform a single function. Take it step by step and you will get to a valid solution (and there are really a number of possible ways to arrange this).
See my arrangement on the screenshots below. If you get stuck, just use the design from our resulting project in https://github.com/castle-engine/bad-chess/ (in project/version_2_with_code subdirectory).
The outcome of my design is that I know that from code, I can:
-
Adjust
Rotationproperty of theTransformForceAnglecomponent to be a simple rotation around the X axis. The angle of this rotation can be chosen by user and effectively the arrow will orbit around the debug box (chess piece). -
Adjust Y of the
Scaleproperty of theTransformForceStrengthcomponent. The amount of this scale can be chosen by user to visualize the strength.
Remember to set Exists of the DebugBoxToBeHidden component to false once done.
6.2. Add the arrow to the main design
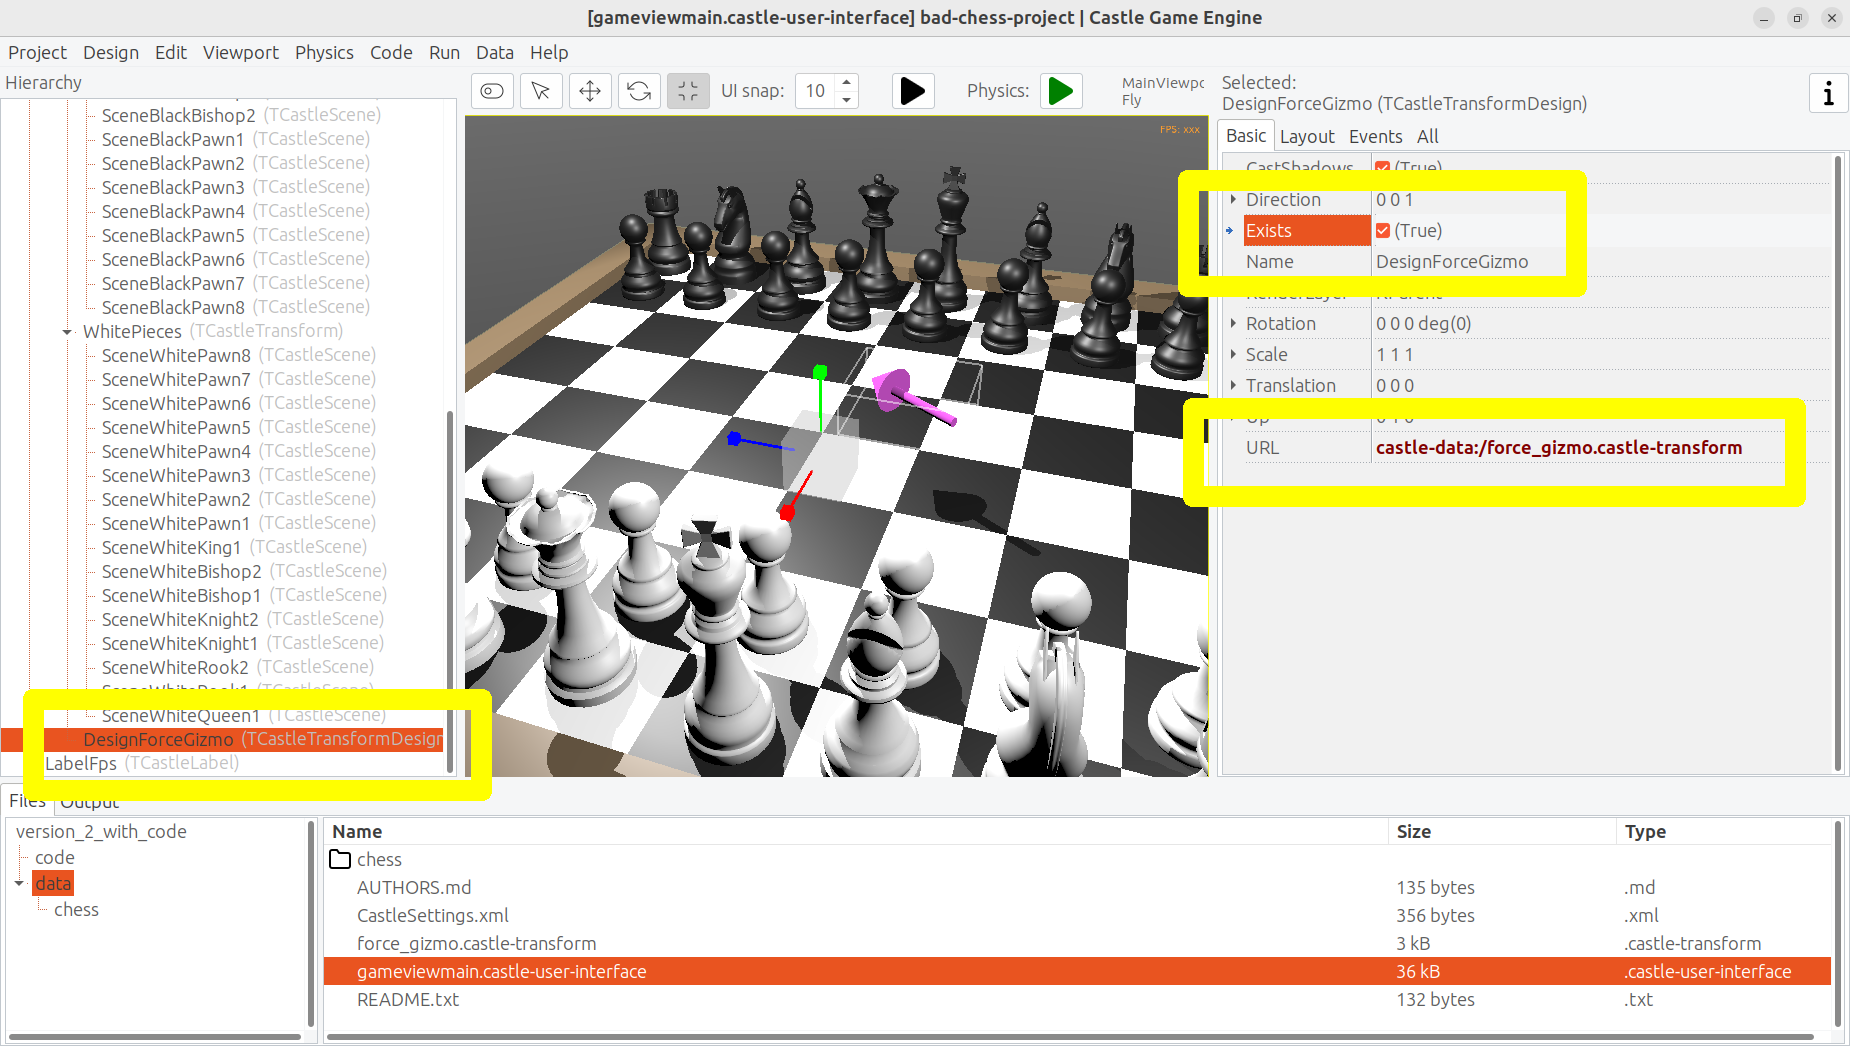
To test that it works, add the arrow design to the main design using the editor.
Save the design force_gizmo.castle-transform, open our main design in gameviewmain.castle-user-interface, select the Items component inside MainViewport and drag-and-drop the file force_gizmo.castle-transform (from the "Files" panel below) on the hierarchy.
The result should be that a new component called DesignForceGizmo1 is created and placed as a child of Items. The component class is TCastleTransformDesign, which means that it’s an instance of TCastleTransform loaded from another file with .castle-transform extension. The URL property of this component should automatically be set to indicate our force_gizmo.castle-transform file.
Rename this component to just DesignForceGizmo (up to you, but I think it makes things clearer — we will only ever need one such gizmo). Moreover, change the Exists property of this component to false because initially, we don’t want this component to be visible or pickable by the mouse.
The screenshot below shows the state right before I set Exists to false.
6.3. Letting user control the arrow
We need to declare and initialize the fields that describe current angle and strength.
Add this to the private section of the TViewMain class:
TransformForceAngle, TransformForceStrength: TCastleTransform;
ForceAngle: Single;
ForceStrength: Single;
Then let’s set some constants. You can declare them at the beginning of unit GameViewMain implementation:
const
  MinStrength = 1;
  MaxStrength = 1000;

  MinStrengthScale = 1;
  MaxStrengthScale = 3;

  StrengthChangeSpeed = 30;
  AngleAChangeSpeed = 10;
Add to the uses clause new necessary units: Math, CastleUtils.
Finally add to the TViewMain.Start additional piece of code to initialize everything:
  TransformForceAngle := DesignForceGizmo.DesignedComponent('TransformForceAngle')
    as TCastleTransform;
  TransformForceStrength := DesignForceGizmo.DesignedComponent('TransformForceStrength')
    as TCastleTransform;
  ForceAngle := 0; // 0 is default value of Single field anyway
  TransformForceAngle.Rotation := Vector4(1, 0, 0, ForceAngle);
  ForceStrength := 10; // set some sensible initial value
  TransformForceStrength.Scale := Vector3(1,
    MapRange(ForceStrength, MinStrength, MaxStrength, MinStrengthScale, MaxStrengthScale),
    1);
Note that we initialize the components within our DesignForceGizmo design using the DesignForceGizmo.DesignedComponent(…) call. This is necessary, as in general you can have multiple instances of the design force_gizmo.castle-transform placed in your view. So the published fields of the view cannot be automatically associated with components in nested designs.
Moreover we synchronize Single fields ForceStrength and ForceAngle with their counterpart TCastleTransform instances. Single in Pascal is a simple floating-point number, which is super-easy to manipulate. We treat two TCastleTransform instances above as just a fancy way to visualize these numbers as 3D rotation and scale.
You may want to lookup what the MapRange function does in Castle Game Engine API reference. In short, it’s a comfortable way of doing a linear interpolation, converting from one range to another.
Now that we have initialized everything, let’s actually show the DesignForceGizmo when user selects a chess piece. We already have a code to select chess piece on mouse click. Just extend it to show the DesignForceGizmo and reposition it at the selected chess piece.
if Event.IsMouseButton(buttonLeft) then
begin
  OldSelected := ChessPieceSelected;
  if (ChessPieceHover <> nil) and
     (ChessPieceHover <> ChessPieceSelected) then
  begin
    ... // keep existing code

    // new lines:
    DesignForceGizmo.Exists := true;
    DesignForceGizmo.Translation := ChessPieceSelected.Parent.WorldTranslation;
  end;
  Exit(true); // mouse click was handled
end;
Note: You may wonder about an alternative approach, where we don’t reposition DesignForceGizmo, but instead dynamically change it’s parent, like DesignForceGizmo.Parent := ChessPieceSelected.Parent. This would work too, alas with some additional complications: the rotation of the selected object, once we flick it, would rotate also the gizmo. This would make the calculation of "desired flick direction" later more complicated. So I decided to go with the simpler approach of just repositioning the DesignForceGizmo. If you want to experiment with the alternative complicated approach, go ahead, one solution would be to design DesignForceGizmo such that you can later do TransformForceAngle.GetWorldView(WorldPos, WorldDir, WorldUp) and use resulting WorldDir as a force direction.
But since we keep things simple… we’re almost done. You can run the game and see that selecting a chess piece shows the arrow gizmo properly. It remains to allow user to change direction and strength. We can do this by observing the keys user presses in the Update method. The code below allows to rotate the arrow (make it orbit around the chess piece) using left and right arrow keys, and change force strength (scaling the arrow) using up and down arrow keys. Add this code to your existing Update method:
procedure TViewMain.Update(const SecondsPassed: Single; var HandleInput: Boolean);
begin
  ... // keep existing code
  if Container.Pressed[keyArrowLeft] then
    ForceAngle := ForceAngle - SecondsPassed * AngleAChangeSpeed;
  if Container.Pressed[keyArrowRight] then
    ForceAngle := ForceAngle + SecondsPassed * AngleAChangeSpeed;
  if Container.Pressed[keyArrowUp] then
    ForceStrength := Min(MaxStrength, ForceStrength + SecondsPassed * StrengthChangeSpeed);
  if Container.Pressed[keyArrowDown] then
    ForceStrength := Max(MinStrength, ForceStrength - SecondsPassed * StrengthChangeSpeed);

  TransformForceAngle.Rotation := Vector4(1, 0, 0, ForceAngle);
  TransformForceStrength.Scale := Vector3(1,
    MapRange(ForceStrength, MinStrength, MaxStrength, MinStrengthScale, MaxStrengthScale),
    1);
end;
7. Flick that chess piece!
Looks like we have all the knowledge we need.
-
We know how to flick the chess piece,
-
we know which chess piece to flick,
-
we know the direction and strength of the flick.
You can consult the code we did a few sections before, in the exercise "Push the chess piece using physics". Our new code will be similar. Add it to the Press method implementation:
function TViewMain.Press(const Event: TInputPressRelease): Boolean;
var
  ... // keep existing variables used by other inputs
  ChessPieceSelectedScene: TCastleScene;
  ForceDirection: TVector3;
begin
  Result := inherited;
  if Result then Exit; // allow the ancestor to handle keys

  ... // keep existing code handling other inputs

  if Event.IsKey(keyEnter) and (ChessPieceSelected <> nil) then
  begin
    ChessPieceSelectedScene := ChessPieceSelected.Parent as TCastleScene;
    MyBody := ChessPieceSelectedScene.FindBehavior(TCastleRigidBody) as TCastleRigidBody;
    ForceDirection := RotatePointAroundAxis(
      Vector4(0, 1, 0, ForceAngle), Vector3(-1, 0, 0));
    MyBody.ApplyImpulse(
      ForceDirection * ForceStrength,
      ChessPieceSelectedScene.WorldTranslation);
    // unselect after flicking; not strictly necessary, but looks better
    ChessPieceSelected := nil;
    DesignForceGizmo.Exists := false;
    Exit(true); // input was handled
  end;
end;
Depending on how you designed the force_gizmo.castle-transform design, you may need to adjust the ForceDirection calculation, in particular the 2nd parameter to RotatePointAroundAxis which is a direction used when angle is zero. There’s nothing magic about our value Vector3(-1, 0, 0), it just follows our force_gizmo.castle-transform design.
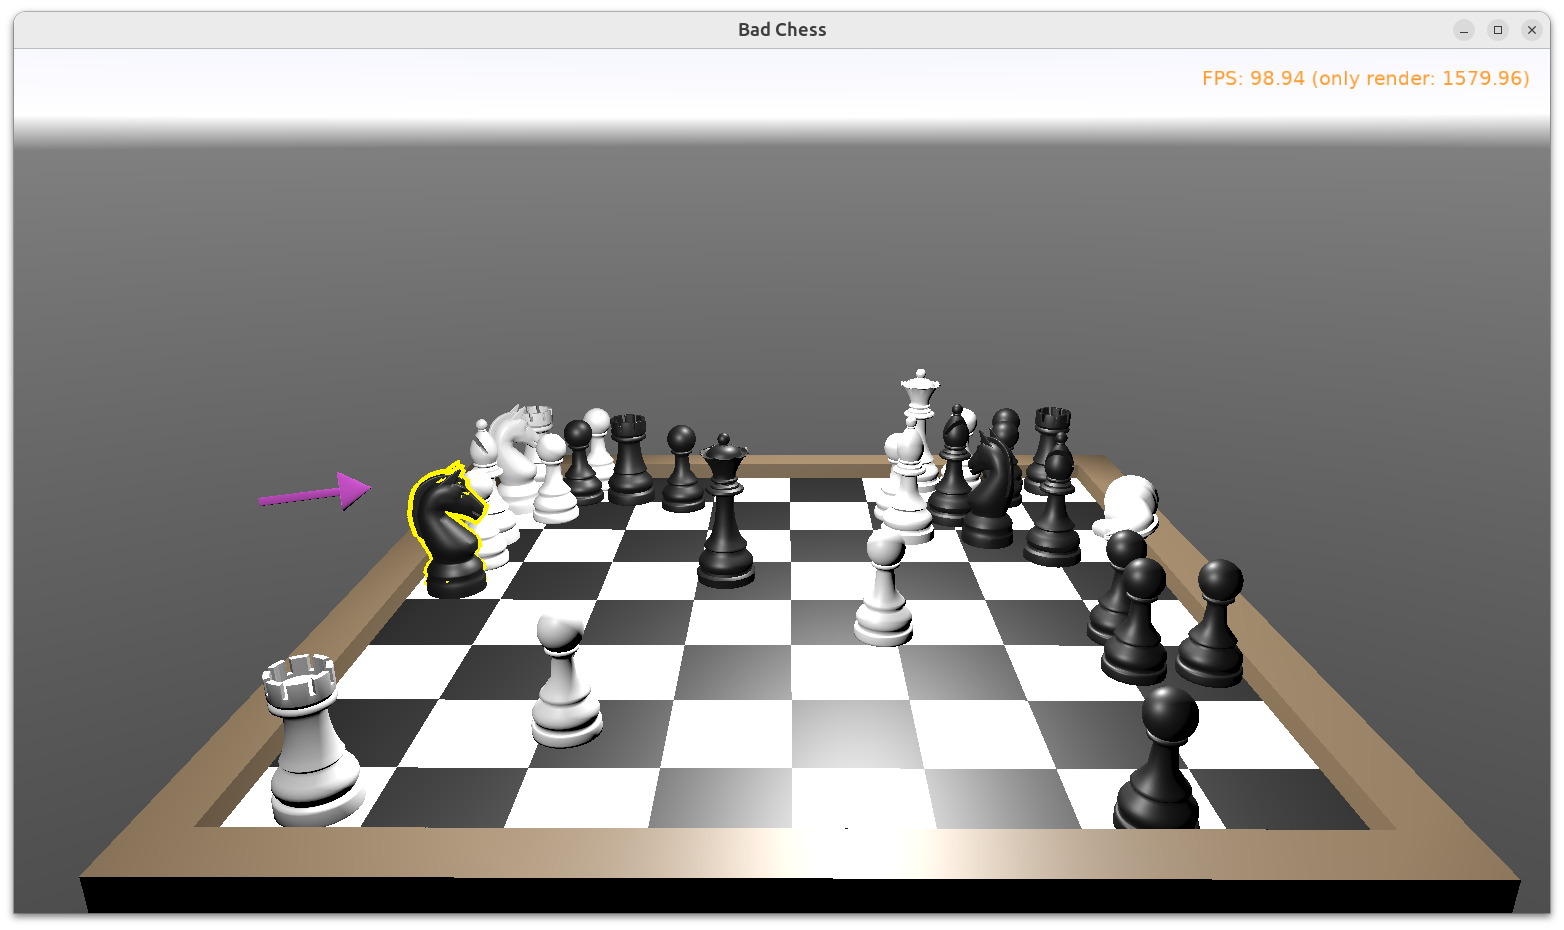
Run the game and see that you can now flick the chess pieces!
-
Select the chess piece by clicking with mouse.
-
Rotate the force by left and right arrow keys.
-
Change the force strength by up and down arrow keys.
-
Flick the chess piece by pressing Enter.
-
Repeat :)
8. Conclusion and future ideas
Invite a friend to play with you. Just take turns using the mouse to flick your chess pieces and have fun :)
I am sure you can invent now multiple ways to make this better.
-
Maybe each player should be able to flick only its own chess pieces? We already know which chess piece is black or white (the
Blackboolean field inTChessPieceBehavior), though we didn’t use it for anything above. You should track which player flicked the object last (black or white), and only allow to choose the opposite side next time. -
Maybe you want to display some user interface, like a label, to indicate whose turn is it? Just drop a
TCastleLabelcomponent on view, and change the label’sCaptionwhenever you want. -
Maybe you want to show the current force angle and strength — either as numbers, or as some colorful bars? Use
TCastleRectangleColorfor a trivial rectangle with optional border and optionally filled with a color. -
Maybe you want to implement a proper chess game? Sure, just track in code all the chess pieces and the chessboard tiles — what is where. Then add a logic that allows player to select which piece and where should move. Add some validation. Add playing with a computer opponent if you wish — there are standardized protocols to communicate with "chess engines" so you don’t need to implement your own chess AI from scratch.
-
Maybe you want to use networking? You can use a number of networking solutions (any Pascal library) together with Castle Game Engine. See https://castle-engine.io/multi_player . We have used the engine with Indy and RNL (Realtime Network Library). In the future we plan to integrate the engine with Nakama, an open-source server and client framework for multi-player games.
-
Maybe you want to deploy this game to other platforms, in particular mobile? Go ahead. The code we wrote above is already cross-platform and can be compiled using Castle Game Engine to any Android or iOS. Our build tool does everything for you, you get a ready APK, AAB or IPA file to install on your phone. See the engine documentation on https://castle-engine.io/android .
Although keyboard inputs will not work on mobile. You need to invent and implement a new user interface to rotate the force, change the strength, and actually throw the chess piece. It is simplest to just show clickable buttons to perform the relevant actions. The
TCastleButtonclass of the engine is a button with a freely customizable look.
If you want to learn more about the engine, read the documentation on https://castle-engine.io/ and join our community on forum and Discord: https://castle-engine.io/talk.php . Last but not least, if you like this article and the engine, we will appreciate if you support us on Patreon https://www.patreon.com/castleengine . We really count on your support.
Finally, above all, have fun! Creating games is a wild process and experimenting with "what feels good" is the right way to do it. I hope you will enjoy it.