-
Effect can receive additional data from the Pascal application. This is called uniforms in shader languages. You can provide anything, e.g. time (to animate something), color, matrix, texture.
-
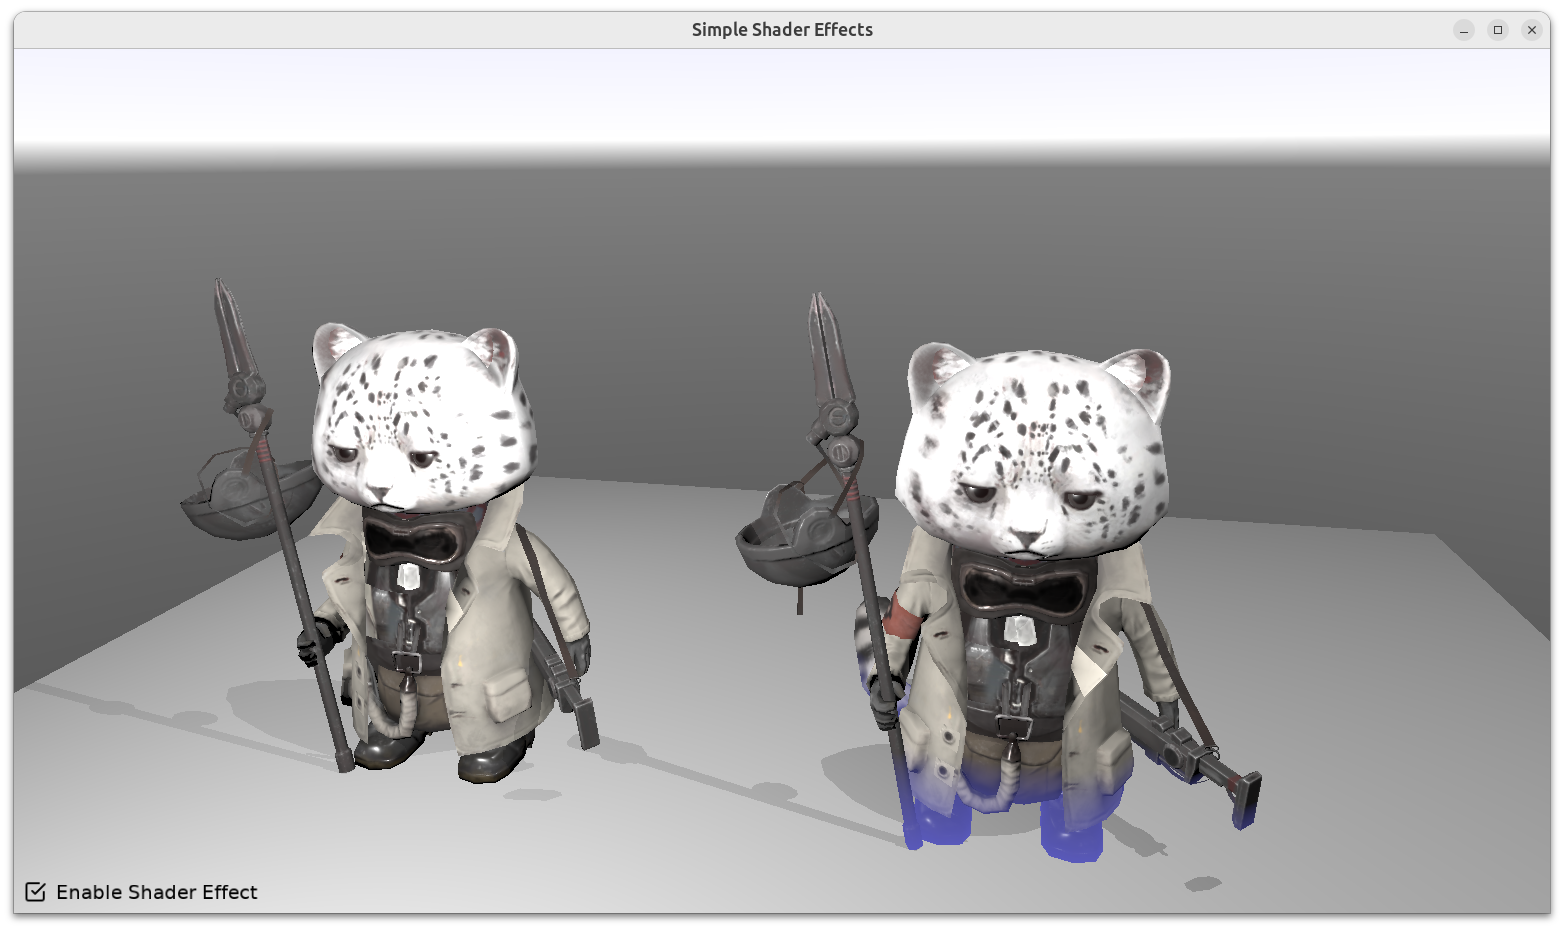
Effect can be easily enabled or disabled at any moment, by setting
TEffectNode.Enabledproperty. -
You can use additional "shader libraries" in the effect, see
TEffectNode.SetShaderLibraries.
Shaders
Table of Contents
- 1. Introduction
- 2. Overview of Using Shader Effects
- 3. Simple Example: Change Color of a Model
- 4. Pass Time To Shader Effect
- 5. Pass Texture to Shader Effect
- 6. Converting Between World and Eye Coordinate Space
- 7. Memory Management of Nodes (TEffectNode, TEffectPartNode)
- 8. Reference of Available PLUG_ Functions
- 9. More Examples
- 10. More Documentation
- 11. Advanced: Other Ways to Use Shaders
- 12. TODO
1. Introduction
Shaders are programs executed by the graphic card. Everything in Castle Game Engine is rendered using shaders and by default the engine automatically generates and compiles all the shaders. Moreover, and this is the focus of this document, you can write your own shader code to customize the rendering.
Some examples of what shaders can do:
-
Apply effects on objects, e.g. color transformations, non-typical texture usage, custom fog equations, adding some noise to make things more varied.
-
Modify how lights work, e.g. define custom spot light shape.
-
Modify how textures work, e.g. create procedural textures determined only by the shader code, or animated textures.
-
Create non-realistic effects, e.g. cartoon rendering, chromatic aberration.
-
Animate anything.
NoteShaders can even animate transformations (move, rotate, scale) of objects. But (without some non-trivial extra work like transform feedback), only the graphic card knows about the animation outcome. So collisions (physics) still work with original object transformations, not the animated ones.
The power of shaders is that the above operations are extremely customizable. You define all the logic, equations and parameters of the effect. And it all runs on a graphic card, so it is very efficient.

2. Overview of Using Shader Effects
The recommended way to provide your own shader code are the TEffectNode and TEffectPartNode classes.
-
They allow you to specify your own shader code written in GLSL (OpenGL Shading Language), which is the language used by OpenGL (and OpenGLES, WebGL, Vulkan) to define shaders.
If you want to learn GLSL, check out the Khronos wiki, GLSL specification and (for some more newbie-friendly introduction) sites like Learn OpenGL: Shaders.
-
Shader code defined this way is combined with the existing shaders of the engine. This means that when you define custom shader effects — you still benefit from the built-in rendering of the engine, like lighting, shadows, and so on. You only enhance it. To make this possible, your shader code defines special functions whose name starts with
PLUG_that will be called by the engine shaders at the right time. -
The effects created this way also play nicely with each other. Multiple effects (
TEffectNodeinstances) can be active at the same time on the same object. Each effect can be enabled and disabled independently. They will be applied in the order you specify. -
The
TEffectPartNodeinstance points to a shader code (in GLSL language), which can be written as a string in the Pascal source code, or loaded from a file. Usually it is loaded from a file in the application data. -
The
TEffectNodeinstance groups together severalTEffectPartNodeinstances and allows for additional control of the shader: -
Once you have created
TEffectNode, the simplest way to use it is to invoke aSetEffectsmethod available on various engine components: -
TEffectNodeandTEffectPartNodeare both X3D nodes. Don’t worry, we explain below what it means in practice. In short:-
Effect nodes can be connected with other X3D nodes (like
TImageTextureNode) and fields (likeTSFFloat,TSFNode) to pass additional data to the shader effect. This is very useful. -
Memory of nodes is by default managed using reference-counting (counting only the references from the other X3D nodes). Sometimes this is desirable, sometimes not so much. In the latter case, you can just disable this using
TX3DNode.WaitForReleaseand release the nodes explicitly, see Memory Management of Nodes.
-
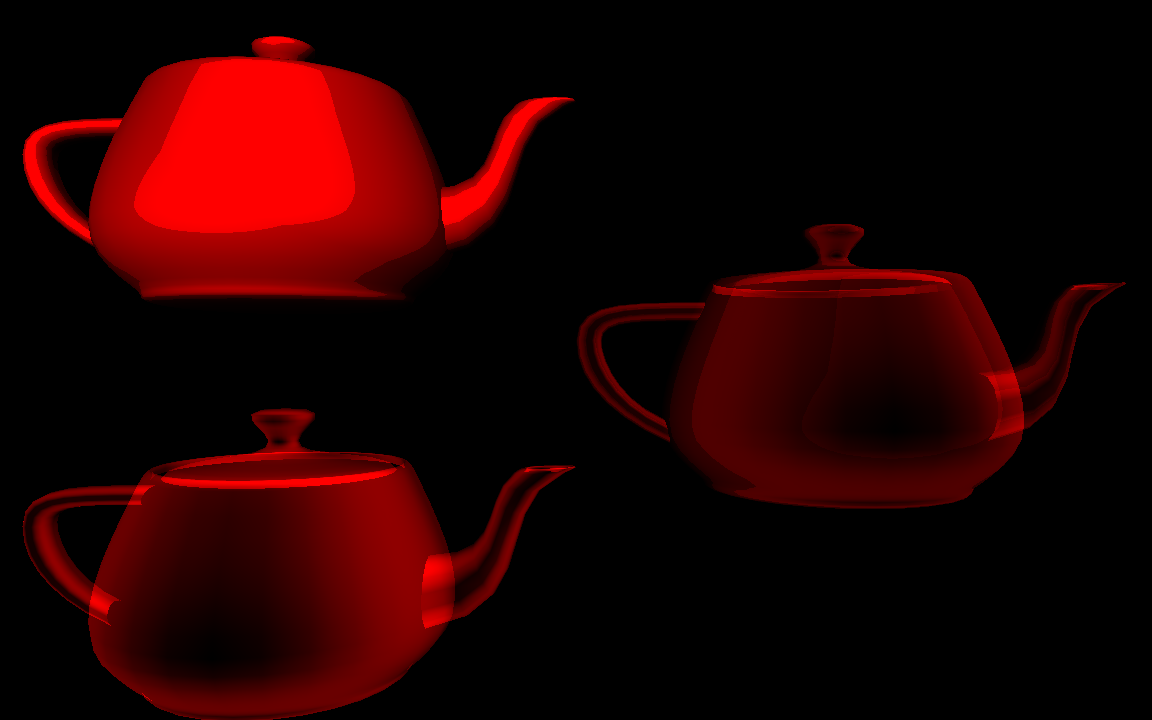
3. Simple Example: Change Color of a Model
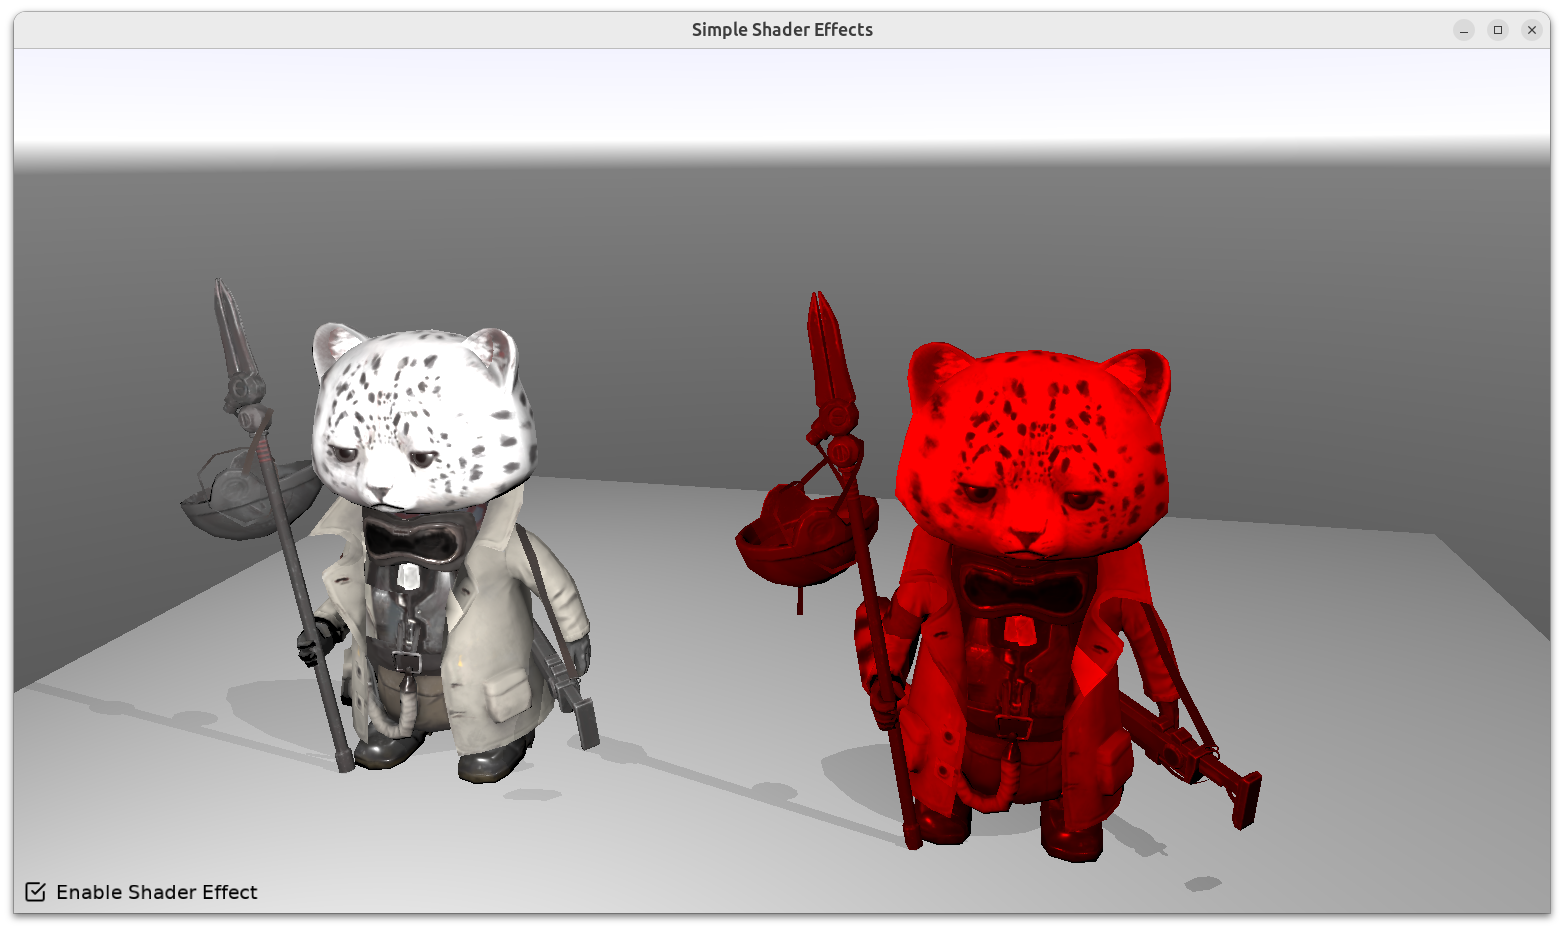
Follow this example to learn how to use shader effects in Castle Game Engine.
First, create a simple Castle Game Engine application with a TCastleScene inside a TCastleViewport that shows some model (from any supported format, like glTF or X3D).
Access the TCastleScene instance in your code, by declaring in the published section of your view a new field with name matching your scene, like MyScene: TCastleScene;.
|
Note
|
If you’re not sure what does the above mean, please first read the Tutorial: Designing a 3D world where we explain how to use basic engine components like TCastleViewport and TCastleScene.
|
Then, create a shader effect that will change the color of any model to shades of red. This is done by creating a TEffectNode and TEffectPartNode and attaching them by calling MyScene.SetEffects method. In this example, we do this in the Start method of your view class, which is called once, when the view starts.
procedure TMyView.Start;

  procedure CreateSimpleEffect;
  var
    Effect: TEffectNode;
    EffectPart: TEffectPartNode;
  begin
    Effect := TEffectNode.Create;
    Effect.Language := slGLSL;

    EffectPart := TEffectPartNode.Create;
    EffectPart.ShaderType := stFragment;
    EffectPart.SetUrl(['castle-data:/shader_color_effect.fs']);
    Effect.SetParts([EffectPart]);

    MyScene.SetEffects([Effect]);
  end;

begin
  inherited;
  CreateSimpleEffect;
end;|
Note
|
To compile this code, you need to put in the uses clauses all the necessary engine units. Make sure you use X3DNodes, CastleScene, CastleRenderOptions.
|
Now we need to define the shader code. Create a file shader_color_effect.fs in the data subdirectory of your application, and put the following code inside:
// Modify the fragment color.
void PLUG_fragment_modify(inout vec4 fragment_color)
{
  // Make the color red by setting
  // - the red color channel to the overall intensity
  // - the green and blue channels to zero.
  float intensity = (fragment_color.r + fragment_color.g + fragment_color.b) / 3.0;
  fragment_color = vec4(intensity, 0.0, 0.0, fragment_color.a);
}
Run the application, and you should see that the model is now rendered with a red color.
See the ready example following this approach in the examples/shaders/shader_effects_simple directory of the Castle Game Engine repository. It adds one more feature: toggles the effect using the TEffectNode.Enabled property, so you can see the effect in action and then disable it.
4. Pass Time To Shader Effect
A powerful feature of shader effects is that you can pass any data to them, and this data can be used in the shader code.
On the Pascal side, you create a new X3D field, like TSFFloat to pass the data to the shader effect. To test it out, enhance the previous example:
-
Declare
EffectRedIntensity: TSFFloat;in theprivatesection of your view class, so that you can access it later. Make sure that unitX3DFieldsis in theusesclause of your view. -
Modify the
CreateSimpleEffectprocedure to createEffectRedIntensity, right afterEffectwas created:... Effect := TEffectNode.Create; Effect.Language := slGLSL; // New code: // Add custom field (maps to GLSL uniform "red_intensity"), initially 0.0 EffectRedIntensity := TSFFloat.Create(Effect, true, 'red_intensity', 0.0); Effect.AddCustomField(EffectRedIntensity); .... -
Update the value of this field in the
Updatemethod of your view, so that it changes over time.Add the
WorldTime: TFloatTime;field to your view class, and make sure you haveCastleTimeUtilsunit in theusesclause.Then modify the
Updatemethod to increase it, and based on it set theEffectRedIntensityvalue:procedure TViewMain.Update(const SecondsPassed: Single; var HandleInput: Boolean); begin inherited; LabelFps.Caption := 'FPS: ' + Container.Fps.ToString; // Update the time WorldTime := WorldTime + SecondsPassed; // Set the red intensity based on time EffectRedIntensity.Send((Sin(10 * WorldTime) + 1) / 2); end;
The Pascal part of the job is done: we animate the red_intensity uniform variable value. It remains to actually use this variable in the shader code.
-
Declare it in the shader code
shader_color_effect.fsbyuniform float red_intensity;. -
Modify the code that assigns the fragment color. Use the GLSL mix function to interpolate between the original color and the new red color based on
red_intensityvalue.-
When
red_intensityis 1.0, behave as in the previous version: reddish color. -
When
red_intensityis 0.0, do not change to the color. -
Values in between will smoothly interpolate between these two behaviors.
-
In total, new shader_color_effect.fs code looks like this:
// Declare the uniform variable that will receive data from Pascal.
uniform float red_intensity;

// Modify the fragment color.
void PLUG_fragment_modify(inout vec4 fragment_color)
{
  // Make the color red by setting
  // - the red color channel to the overall intensity
  // - the green and blue channels to zero.
  float intensity = (fragment_color.r + fragment_color.g + fragment_color.b) / 3.0;
  vec4 reddish_color = vec4(intensity, 0.0, 0.0, fragment_color.a);
  fragment_color = mix(fragment_color, reddish_color, red_intensity);
}
Run the application to observe the animation, a psychedelic effect of a "pulsating red cat". Enjoy, just don’t stare at it for too long :)
If you got lost, see the example examples/shaders/shader_effects_simple for a ready code implementing the above. Just
-
define the symbol
ANIMATE_RED_INTENSITYin the code/gameviewmain.pas and -
uncomment the proper shader version in data/shader_color_effect.fs.
5. Pass Texture to Shader Effect
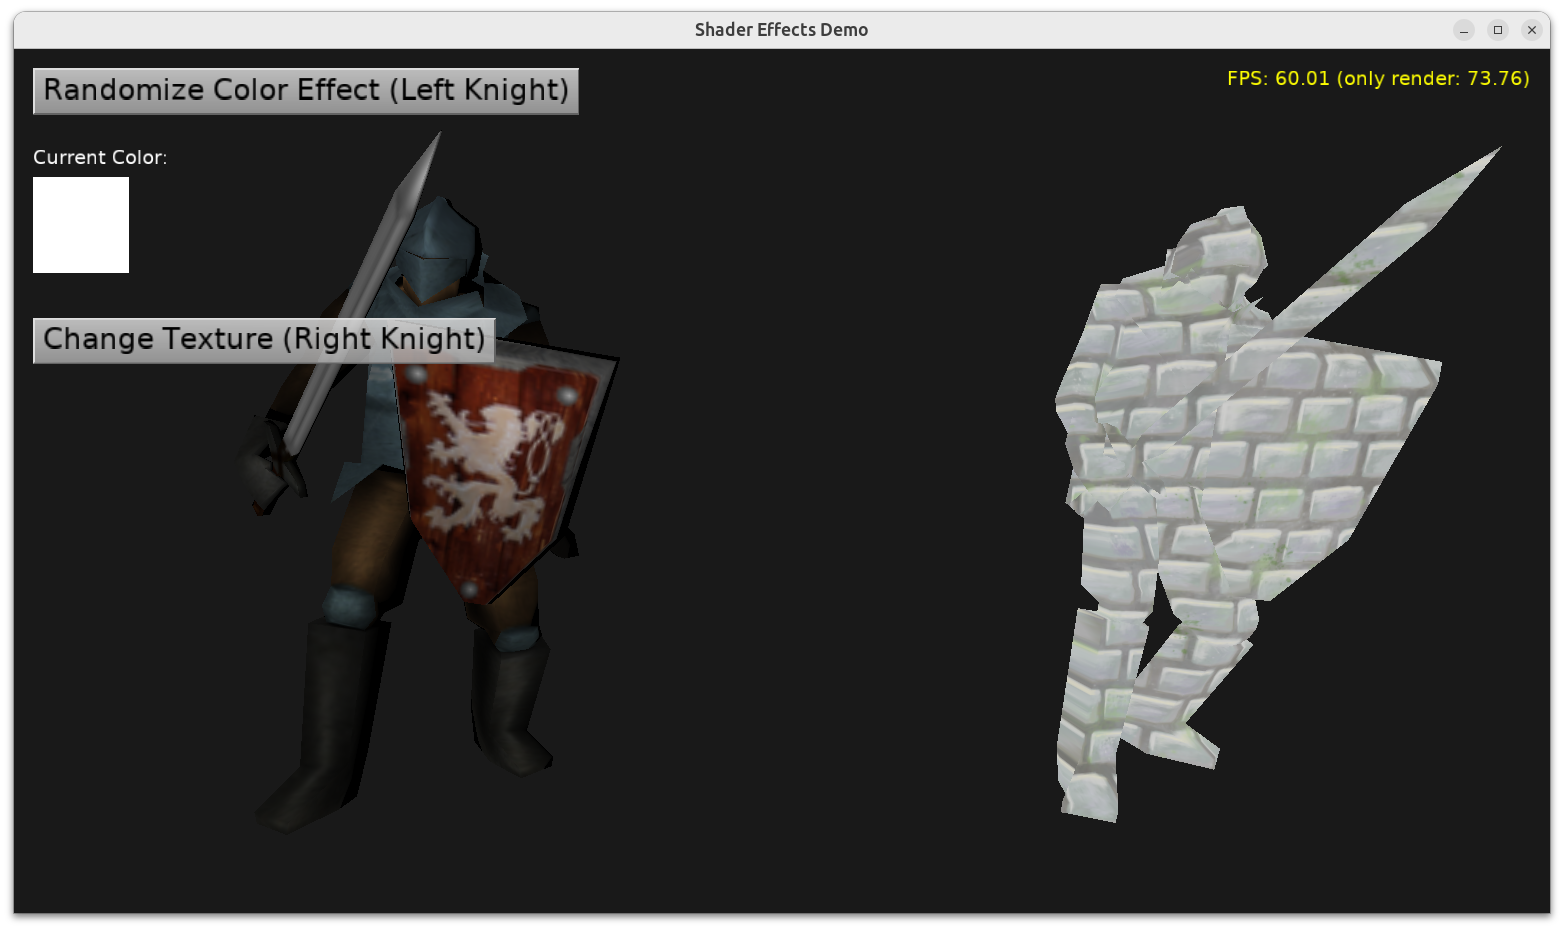
Not only simple values can be passed to shader effects. You can also pass textures, which is useful for many effects. You can mix the texture with the existing rendering or just use the texture as a source of some data (1D, 2D or 3D) for the shader code.
Short overview:
-
To pass a texture to the shader effect, you need to create a node holding the texture (like
TImageTextureNodefor the simplest 2D texture) and then create a field of typeTSFNodeto pass the texture to the shader effect. -
In the shader code, declare the uniform like
uniform sampler2D …;and sample the texture using GLSLtexture2Dfunction. You need to calculate from something the texture coordinates (of you could provide them to the mesh usingTFloatVertexAttributeNode, but this is beyond the scope of this introduction).
Here’s the detailed breakdown of how to do this:
-
In Pascal code, create
TImageTextureNodeinstance with some content:TestTexture := TImageTextureNode.Create; TestTexture.SetUrl(['castle-data:/my_texture.png']); -
Create
TSFNodeinstance to pass the texture to the shader effect:EffectTextureField := TSFNode.Create(Effect, true, 'testTexture', [TImageTextureNode], TestTexture); Effect.AddCustomField(EffectTextureField); -
In the shader code, declare the uniform variable to receive the texture:
uniform sampler2D testTexture; -
Use the texture in the shader code, e.g. by sampling it:
fragment_color.rgb = texture2D(testTexture, tex_coord).rgb;
See the example code examples/shaders/shader_effects_on_shape for a ready implementation of this approach.
For more involved example, see the examples/shaders/shader_effects_on_background that passes around a cubemap texture (using TImageCubeMapTextureNode on the Pascal side, and uniform samplerCube test_cube_map; on the GLSL side).
6. Converting Between World and Eye Coordinate Space
An important concept to remember when writing shaders is that values may be expressed in different coordinate spaces. Some of the coordinate spaces commonly used in shaders are:
-
"Eye coordinate space" (sometimes also called "camera coordinate space"). In this space, everything is moved and rotated such that the camera is at the origin (0, 0, 0) and looking down the negative Z axis.
-
"World coordinate space". Everything is expressed in the global coordinates. Think of it as assigning unique 3D coordinates to everything in the universe. This is the most natural coordinate space to think about, when thinking of a whole 3D world.
-
"Object coordinate space". This is the coordinate system in which the vertexes of a particular object are defined. This is used in the
TCoordinateNodevalues. Transformations of the object (like translation, rotation, scaling) are applied to convert from object coordinate space to world coordinate space. -
"Tangent coordinate space" (sometimes also called "tangent space"). This is the coordinate system specific to every face. Unless you implement your own bump mapping, you probably don’t need to deal with it.
For efficiency, many shader operations are performed in the eye coordinate space.
It’s a common task to convert back and forth between the world coordinate space and the eye coordinate space, since some computations make sense only in the world coordinate space. For example, if you want to define a fog that makes the bottom of the 3D world blueish, you want to determine the amount of fog based on the rendered point y coordinate in the world coordinate space.
To implement this, use the TEffectNode.SetShaderLibraries method to get additional GLSL functions that can convert between the coordinate spaces.
-
Add the library by calling
Effect.SetShaderLibraries(['castle-shader:/EyeWorldSpace.glsl']);This provides 4 functions for usage in your shader code:
vec4 position_world_to_eye_space(vec4 position_world); vec4 position_eye_to_world_space(vec4 position_eye); vec3 direction_world_to_eye_space(vec3 direction_world); vec3 direction_eye_to_world_space(vec3 direction_eye); -
In your
TEffectPartNodeshader code, define theposition_eye_to_world_spacefunction signature, and use it. InPLUG_fragment_eye_spaceget the coordinates in eye space, convert them to world space usingposition_eye_to_world_space. InPLUG_fragment_modifyuse thevertex_world.yto determine the amount of fog.vec4 position_eye_to_world_space(vec4 position_eye); // Save value obtained in PLUG_fragment_eye_space to use in PLUG_fragment_modify. vec4 vertex_world; // Get the vertex position in world space. void PLUG_fragment_eye_space( const vec4 vertex_eye, inout vec3 normal_eye) { vertex_world = position_eye_to_world_space(vertex_eye); } // Make lower things enveloped in fog (turn into gray). void PLUG_fragment_modify( inout vec4 fragment_color) { const float fog_y_start = 0.5; const float fog_y_max = 0.0; if (vertex_world.y < fog_y_start) { const vec4 bottom_fog_color = vec4(0.1, 0.1, 0.5, 1); float factor = max(0.0, (vertex_world.y - fog_y_max) / (fog_y_start - fog_y_max)); fragment_color = mix(bottom_fog_color, fragment_color, factor); } }
7. Memory Management of Nodes (TEffectNode, TEffectPartNode)
In general, in Pascal, you should take care to freeing all the class instances you create. You can free them explicitly or use the ownership mechanism of TComponent or lists like TObjectList. See the modern Pascal introduction for more information.
However, X3D nodes have a special memory management mechanism. As soon as they are added as a child of something else, the reference counting is in effect and the node instance will be automatically freed when it is no longer used by anything else.
This usually works in a natural way. In the example above, we just didn’t care at all about freeing TEffectNode and TEffectPartNode instances, and that’s OK. The TEffectPartNode is referenced by TEffectNode, and TEffectNode is referenced by MyScene. So they wil be automatically freed when MyScene is freed, because at this point nothing will refer to them anymore.
Sometimes this "automatic free when no longer used" mechanism gets in the way. In such case, just deactivate it:
-
Right after creating a node, call
TX3DNode.WaitForRelease. For example:Effect := TEffectNode.Create; Effect.WaitForRelease;Now you have to explicitly free
Effectwhen you no longer need it. -
To free the node, you could just call
FreeAndNil(Effect). But this is dangerous. What if something still refers to it, e.g. some scene? The recommended way is to callNodeReleasethat returns the control to the reference counting mechanism ("node will be freed if it becomes unused") and callsFreeIfUnusedAndNil("free the node now, if it is no longer used by anything else right now"). For example:NodeRelease(Effect);This also sets
Effecttonil, as you should no longer use this instance. Just likeFreeAndNil, it’s better to have a pointer set tonilthan have an undefined dangling pointer.
For an example using this approach to manually manage memory of shader effects, see GameViewMain unit in examples/shaders/shader_effects_on_background.
8. Reference of Available PLUG_ Functions
To learn all the available PLUG_ functions that you can use in your shader code, follow the Reference of available plugs.
9. More Examples
Directory examples/shaders of the engine contains a number of examples showing how to use shaders:
-
shader_effects_on_primitives shows using effects on
TCastleBox,TCastleSphere,TCastleImageTransform. -
shader_effects_on_shape uses
Effectnodes to enhance the standard rendering (on shapes). It shows how to pass colors and textures to the shader effect. -
shader_effects_on_texture uses
Effectnodes on texture nodes. Follow the README of the example to know all the details. This allows to modify shaders that process given texture.To use this approach effectively, you need to search the loaded model for existing textures (or add new texture nodes to the model). The example shows how to enumerate loaded texture nodes.
-
shader_effects_on_background uses
Effectnodes onTCastleBackground. See more information about backgrounds.
10. More Documentation
We have a bigger document about this approach to managing shaders. We also have (warning: a bit outdated, some PLUG names changed since then) slides about this from the Theory and Practice of Computer Graphics 2011 conference.
11. Advanced: Other Ways to Use Shaders
This page focuses on how to use shader effects (TEffectPartNode, TEffectNode) with engine comfortable components like TCastleScene and shows the recommended approach for Pascal developers.
There are other ways to use shaders in our engine.
11.1. Add Effects to specific X3D groups, appearances, textures, lights
If you want to access the nodes of your scene directly, you can assign use TEffectNode to:
-
Influence any subset of X3D nodes, by adding
TEffectNodeto grouping nodes likeTGroupNodeorTTransformNode. -
Influence a particular X3D shape appearance, by using
TAppearanceNode.SetEffects. -
Write special shaders that influence texture rendering and use them by
TAbstractSingleTextureNode.SetEffects. This is actually exactly used by the shader_effects_on_texture example mentioned above. -
Write special shaders that influence lighting application and use them by
TAbstractLightNode.SetEffects.
11.2. Write Effects in X3D Files
If you are an X3D author, you can simply write Effect and EffectPart nodes in your X3D files. See demo-models, subdirectory compositing_shaders for examples. The subdirectory water contains also water effects.
Such X3D files can be loaded in the engine using TCastleScene.
This allows to see the customized shader in games / applications, and in the editor and in Castle Model Viewer.
|
Note
|
FreeWRL, another excellent VRML / X3D browser, also implements the Effect and EffectPart nodes. Their implementation is independent of our engine, confirming that the approach to write shaders we propose makes sense also outside of our engine. Thank you Doug Sanden for implementing this in FreeWRL!
|
11.3. Override Engine Shaders by ComposedShader and ShaderPart nodes
You can also use X3D nodes ComposedShader and ShaderPart. Either in X3D files, or from Pascal through TComposedShaderNode and TShaderPartNode.
We don’t recommend this approach, as it means that your shader code overrides what the engine does. So you need to implement everything you need from scratch, like lighting, shadows, and so on. This is not recommended for most use-cases, as it requires more work, more knowledge of how rendering works in general, and how Castle Game Engine does rendering in particular.
For more information see:
-
Programmable shaders (X3D component) documentation.
-
X3D examples in demo-models, subdirectory shaders.
-
Pascal example in examples/shaders/shader_override.
12. TODO
The most important TODO is that we want to define more comfortable components to customize materials, and this includes assigning effects to materials.
-
This will make the above operations more comfortable,
-
and also available to be easily tested at design-time (in the editor).
-
And the new components wil be just
TComponent, so they will use usualTComponentownership to manage memory, not ref-counting special for X3D nodes (and sometimes needing special treatment to deactivate, as shown above).
To improve this documentation just edit this page and create a pull request to cge-www repository.